
15°C Dew Point Is a Warning: Measure to Prevent Mould in UK Homes
15°C Dew Point Is a Warning: Measure to Prevent Mould in UK Homes
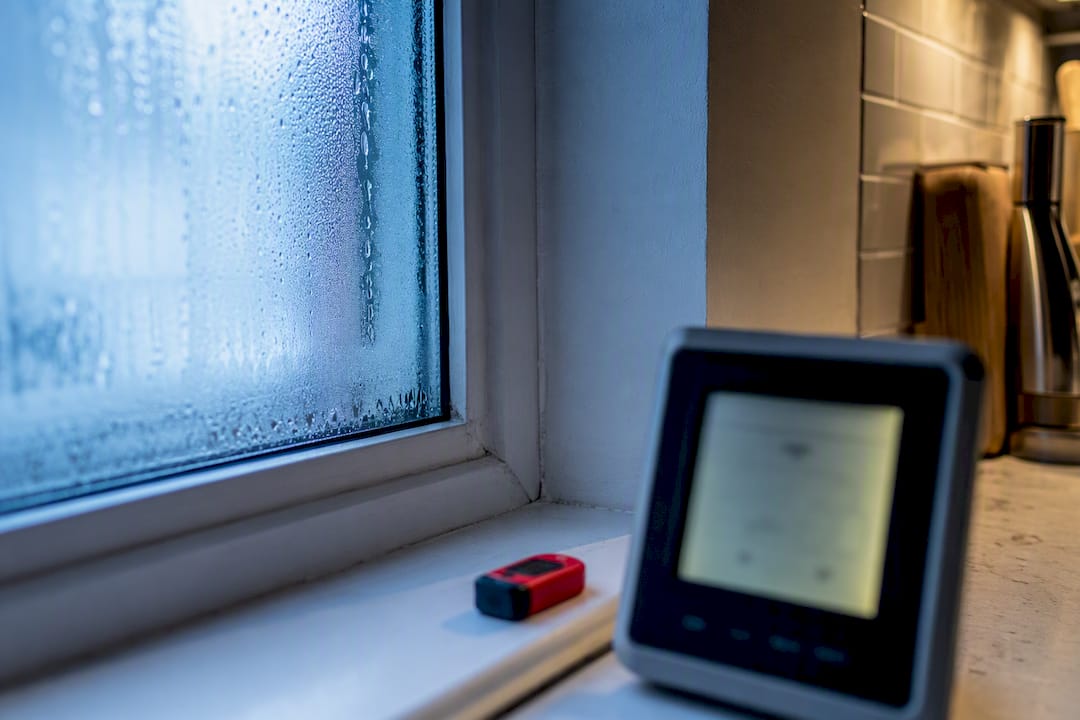
Most recurring household mould appears when the indoor air’s dew point meets or exceeds the temperature of a cold surface, so water condenses out and sits there. Dew point is a more reliable diagnostic figure than relative humidity because it doesn’t drift as room temperature changes. Once you know it, three priorities follow: measure it properly, cut the moisture load causing it, and raise cold surface temperatures or dehumidify until condensation stops forming.
TL;DR:
- Measuring dew point accurately is essential as it remains stable despite room temperature changes, indicating actual moisture risk more reliably than relative humidity.
- Identifying cold surfaces at window frames, corners, or structural thermal bridges is crucial, as these are the primary sites where condensation and mold tend to develop.
- Using sensors at suspected cold spots and log data over several days, especially overnight, helps determine if dew point conditions persist and promote mold growth.
- Surface treatment alone often fails because molds reappear if underlying cold spots or structural causes are not addressed through targeted diagnosis and repairs.
- Professional surveys with thermal imaging and dew point analysis provide precise diagnoses, guiding effective remedial work and preventing recurring mold issues.
Table of Contents
- What dew point and mould have in common: the physics homeowners need to know
- How cold spots and thermal bridges create the microclimate mould needs
- How to measure dew point at home and read the results properly
- Practical prevention: cut moisture, manage climate, fix cold surfaces
- Why cleaning or repainting alone often fails
- How a survey-led dew point analysis works in practice
- Author perspective: what actually stops recurring mould
- When to bring in Quay Point Plastering for a proper diagnosis
- Sources
What dew point and mould have in common: the physics homeowners need to know
Dew point is the temperature at which air, cooled with no change in moisture content, becomes saturated and starts depositing water as condensation. It’s tied to the actual quantity of water vapour in the air, not to the air’s current temperature. That’s the key difference from relative humidity, which shifts constantly because it’s a ratio of current moisture to what the air could hold at that specific temperature. Cool a room by five degrees overnight and the RH reading climbs even though not a single molecule of water has been added. Dew point stays fixed unless moisture is actually added or removed, which makes it the far more stable figure for diagnosing a damp problem rather than just describing one.
Picture a bathroom after a shower. But if the dew point in that air sits at 15°C, and your window glass is sitting at 12°C because it’s a cold morning outside, condensation will form on that glass regardless of what the RH percentage says. The RH number describes comfort. The dew point number tells you where water is about to appear.
For a rough sense of how the two relate in a typical UK living room:
- At 20°C and 40% RH, dew point sits around 6°C
- At 20°C and 50% RH, dew point rises to roughly 9°C
- At 20°C and 60% RH, dew point climbs to around 12°C
- At 20°C and 70% RH, dew point reaches approximately 14°C
Each jump in RH pushes the dew point closer to typical surface temperatures found in an under insulated Victorian bay window or an uninsulated solid wall. That’s the whole mechanism in miniature: raise the moisture load, and you raise the temperature at which condensation becomes possible on every cold surface in the property. Our detailed dew point guide covers how this plays out across different property types.
How cold spots and thermal bridges create the microclimate mould needs
Mould doesn’t grow evenly across a wall. It grows exactly where a surface temperature has dropped below the air’s dew point long enough for a film of moisture to sit there, feeding spores that are already present in ordinary household dust. Surveyors call these locations the first condensing surfaces, because they’re the first places water will appear as air cools. Identifying them is most of the diagnostic work.
Three locations account for the overwhelming majority of domestic mould calls:
- Window reveals and frames. Single glazing and poorly sealed double glazing both drop to outdoor-adjacent temperatures overnight, and the reveal around the frame often has no cavity insulation at all, so it tracks the glass temperature closely.
- Corners and behind furniture. External corners lose heat from two sides at once, dropping their surface temperature several degrees below the flat wall either side. A wardrobe pushed against an external wall blocks air circulation and traps a static, cooling layer of air against the plaster.
- Thermal bridges through the structure. A steel lintel, a concrete floor slab meeting an external wall, or an uninsulated bay window box all conduct heat straight out of the building, creating a localised cold patch on the internal face even when the rest of the room feels warm. Managing these first condensing surfaces is consistently the most effective single intervention against recurring mould, because it removes the physical trigger rather than just the symptom.
A few symptom to cause mappings come up again and again on survey visits. Mould confined to a neat rectangle at the top corner of a north facing bedroom, just below the ceiling, almost always points to a thermal bridge where the roof structure meets the wall plate. Mould running in a vertical stripe down one side of a chimney breast usually tracks a redundant flue that’s acting as a cold air channel. Black speckling behind a bed pushed against an external wall is rarely about the bed. It’s about restricted airflow lowering the surface temperature enough to meet the dew point. Our note on thermal bridging fixes goes through the structural remedies in more depth, and the pattern of mould on north facing walls specifically is common enough to warrant its own explanation.
How to measure dew point at home and read the results properly
You don’t need laboratory equipment to get a usable dew point reading. A basic digital hygrometer costs very little and gives temperature and RH on the same screen; a thermohygrometer with data logging lets you track both over several days rather than relying on a single snapshot, which matters because isolated humidity spikes rarely cause mould on their own. It’s sustained exposure that does the damage.
Placement matters more than the instrument’s price tag. Put a sensor near the suspected cold spot itself, not in the middle of the room where the air is warmest and driest. A second sensor near an interior wall gives you a useful baseline for comparison. Log readings at the same times each day for a week, ideally including one overnight reading, since dew point and surface temperature both tend to converge most closely in the small hours when heating has been off for several hours.
Pro Tip: Don’t panic over a single high reading straight after cooking or a shower. What matters for mould risk is whether the dew point stays elevated for hours at a time, night after night, not a brief spike that clears once you open a door.
Visible mould growth is generally associated with sustained surface adjacent relative humidity around 85%, while spore germination can begin at a slightly lower sustained level of roughly 80%. Isolated spikes above these figures usually don’t cause visible growth without that prolonged exposure.
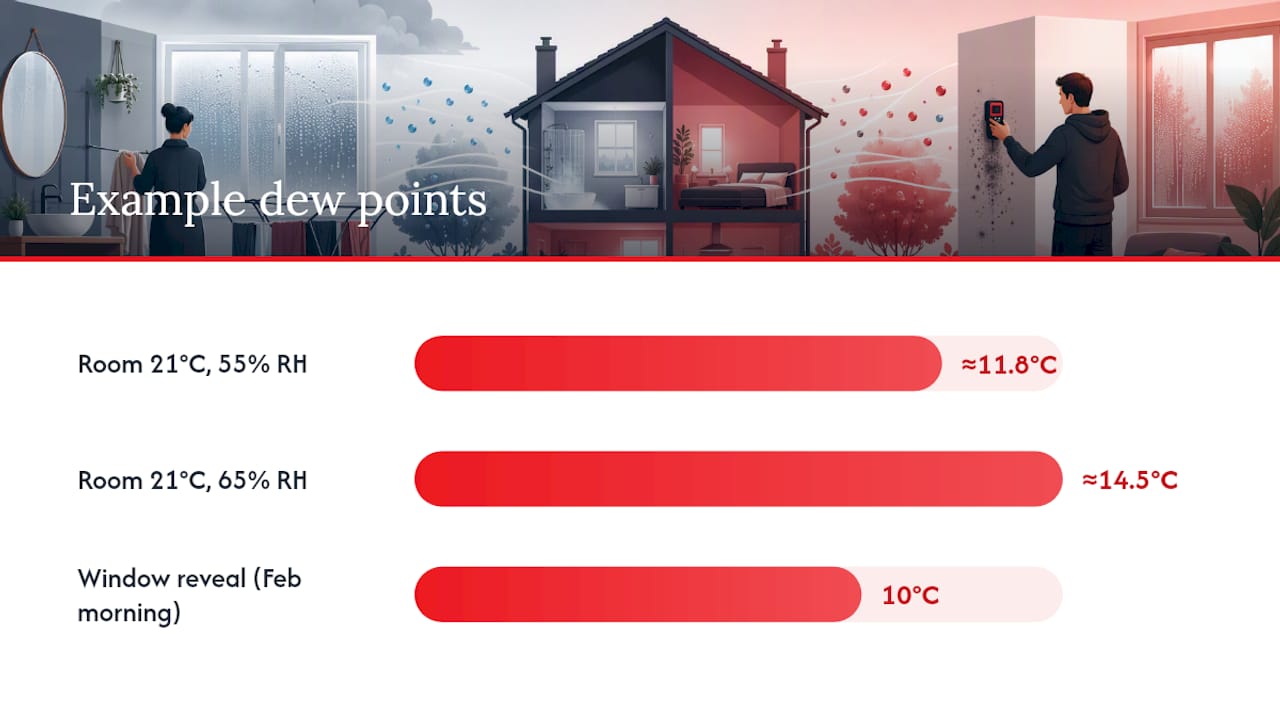
Converting temperature and RH into a dew point figure uses the Magnus approximation, and most affordable dew point calculators do this instantly once you enter the two readings. As a worked example: a room reading 21°C at 55% RH converts to a dew point of roughly 11.8°C. If a nearby window reveal is measuring 10°C on a cold February morning, that surface sits below the dew point and will be actively condensing, whether or not you can see droplets yet. Run the same sum with the room at 65% RH instead, and the dew point rises to around 14.5°C, meaning the same window reveal is now well within condensation territory even on a milder day. That’s the practical value of the calculation: it tells you which readings are safe margin and which are already a problem waiting to show itself on the plaster.
Practical prevention: cut moisture, manage climate, fix cold surfaces
Prevention works on three fronts at once, and skipping one usually means the other two are fighting a losing battle. Moisture load reduction comes first because it’s the cheapest lever and the one entirely within a household’s control day to day.
Simple behavioural changes make a measurable difference:
- Use lids on pans while cooking and run the extractor fan during and after, not just when steam is visible
- Close the bathroom door and run the extractor fan for 15 to 20 minutes after every shower or bath, not just while the water’s running
- Dry laundry outdoors or in a vented tumble dryer where possible, rather than on radiators indoors
- Keep pet bedding and water bowls away from cold external walls, since both add localised moisture.
- Avoid blocking trickle vents or permanently sealing window vents, even in winter
Ventilation is the second lever, and it comes with a genuine caveat that’s often missed in generic advice. Opening a window only helps when outdoor air actually carries less moisture than the air you’re trying to remove. On a damp, misty day, outdoor dew point can sit higher than indoor dew point, meaning an open window is pulling more moisture in than it’s letting out. Extract fans that vent directly outside avoid this problem because they remove moisture-laden air at source rather than relying on a general exchange with outdoor conditions.
Heating and insulation address the surface temperature side of the equation. ASHRAE guidance flags indoor conditions that sit consistently above a dew point of around 60°F, roughly 15°C, as an early warning sign for dampness and mould risk, and recommends monitoring alongside design measures to keep dew point from lingering at that level for extended periods. Keeping background heating steady rather than letting rooms swing cold overnight helps keep surface temperatures a safer margin above dew point, particularly at thermal bridges. A well maintained heating system with consistent output matters here too, and general heating maintenance guidance applies just as much to mould prevention as it does to comfort or running costs.
Dehumidifiers help most in enclosed rooms with limited ventilation options, such as basements or bathrooms without external walls. They work by physically removing water vapour from the air, which lowers the dew point directly rather than just moving air around. For a household already fighting a persistent cold spot, a dehumidifier buys time while a more permanent insulation fix is arranged.
A short weekly routine catches problems before they become visible: check window reveals and sills for any dampness first thing on a cold morning, glance behind large furniture pushed against external walls, and note whether extractor fans are actually running long enough after use rather than being switched off the moment steam clears. Persistent dampness indicators such as a musty smell or visible water staining are worth taking seriously rather than dismissing, since prolonged exposure to damp conditions carries recognised health risks beyond the cosmetic damage to plaster and decoration.
Why cleaning or repainting alone often fails
Bleach and mould-resistant paint remove the visible symptom without touching the cause. If the surface is still dropping below the dew point every night, spores will recolonise within weeks, often looking worse the second time because the substrate has absorbed more moisture with each cycle. This is the single most common frustration reported to us: a homeowner treats a patch three times over two winters, and it returns every time, usually larger.
Certain signs mean a DIY approach has reached its limit and a proper survey is the sensible next step:
- Mould returns within one heating season of cleaning and repainting, even in the same spot and shape.
- White, fluffy, or crystalline deposits appear on the plaster surface alongside or instead of black mould, which usually indicates salt contamination from an underlying moisture source rather than simple condensation.
- Damp patches appear or worsen specifically after heavy rain, pointing towards a penetrating damp issue rather than a purely condensation-driven one.
- Staining or mould has spread across multiple rooms or up from skirting level, suggesting a structural or rising damp component that surface treatment cannot address.
A professional survey goes well beyond a visual glance. It typically combines a structured inspection with targeted hygrometer logging over several days, surface temperature checks at suspected cold spots, and often thermal imaging to map thermal bridges that aren’t obvious to the eye. Salt-contaminated plaster in particular needs testing before any redecoration is attempted, because painting over hygroscopic salts guarantees the finish will fail again regardless of how well ventilation or heating is managed afterwards.
How a survey-led dew point analysis works in practice
A proper investigation starts with a visual inspection of the affected areas, checking for the patterns described earlier: cold corners, thermal bridges, salt deposits, or staining that tracks rainfall. From there, a surveyor places thermohygrometers at the first condensing surfaces and, where useful, in a control location, logging conditions over a period of days rather than relying on a single visit’s snapshot. Surface temperature checks, sometimes backed by thermal imaging, confirm exactly where a wall or window reveal is dropping below the room’s calculated dew point.

The output is not a guess dressed up as an opinion. It is a documented set of findings: logged readings, identified cold spots, and a clear explanation of which mechanism is driving the problem, whether that is condensation, penetrating damp, rising damp, or a combination. From there comes a defined scope of work, costed and specific to what the survey actually found, rather than a generic quote based on square footage. Where remedial work is agreed, it comes with a written guarantee on workmanship, giving homeowners and landlords a documented record they can refer back to if anything recurs. That combination of measurement and paperwork is what separates a diagnosis from a guess.
Author perspective: what actually stops recurring mould
The biggest mistake I see is homeowners treating mould as a cleaning problem rather than a measurement problem. Bleach a patch three times and it comes back three times, because nobody checked whether the wall behind it is sitting below dew point every single night. Measure first. Then isolate exactly where moisture is coming from and where the cold surface is. Only then does remediation actually stick.
Ventilating blindly is the second big error, particularly among landlords told to “just open a window more”. On a damp week in autumn, that can make things worse, not better, because outdoor dew point is sometimes higher than what’s already indoors.
For landlords specifically, log everything: dates, photos, and any tenant reports of mould, alongside what action was taken and when. That record matters if a dispute over responsibility ever arises, and it’s far easier to build as you go than to reconstruct after the fact.
— Quay
When to bring in Quay Point Plastering for a proper diagnosis
We offer an alternative to guesswork repainting for homeowners and landlords who need to know exactly why mould keeps returning, not just how to cover it up again. Every visit starts with a survey: a surveyor inspects the affected areas, takes measurements where they’re needed, and sets out documented findings before any treatment is proposed.

That process leads to a clearly defined scope of work, so you know precisely what’s being fixed and why, followed by a guarantee on the workmanship once remedial work is agreed. It’s a markedly different approach to a quick quote based on a phone description or a photo. If you’re dealing with black mould that keeps reappearing after cleaning, our black mould removal service addresses the underlying condensation source rather than just the surface stain, and our damp and timber survey is the right starting point if you’re not yet sure which mechanism is behind your problem. Landlords managing a tenant report should also see our guidance on what to do if your tenant reports mould before committing to any repair. Book a survey and get a documented answer instead of another repaint that won’t hold.