
Mould on window reveals: a practical guide for homeowners
Mould on window reveals: a practical guide for homeowners
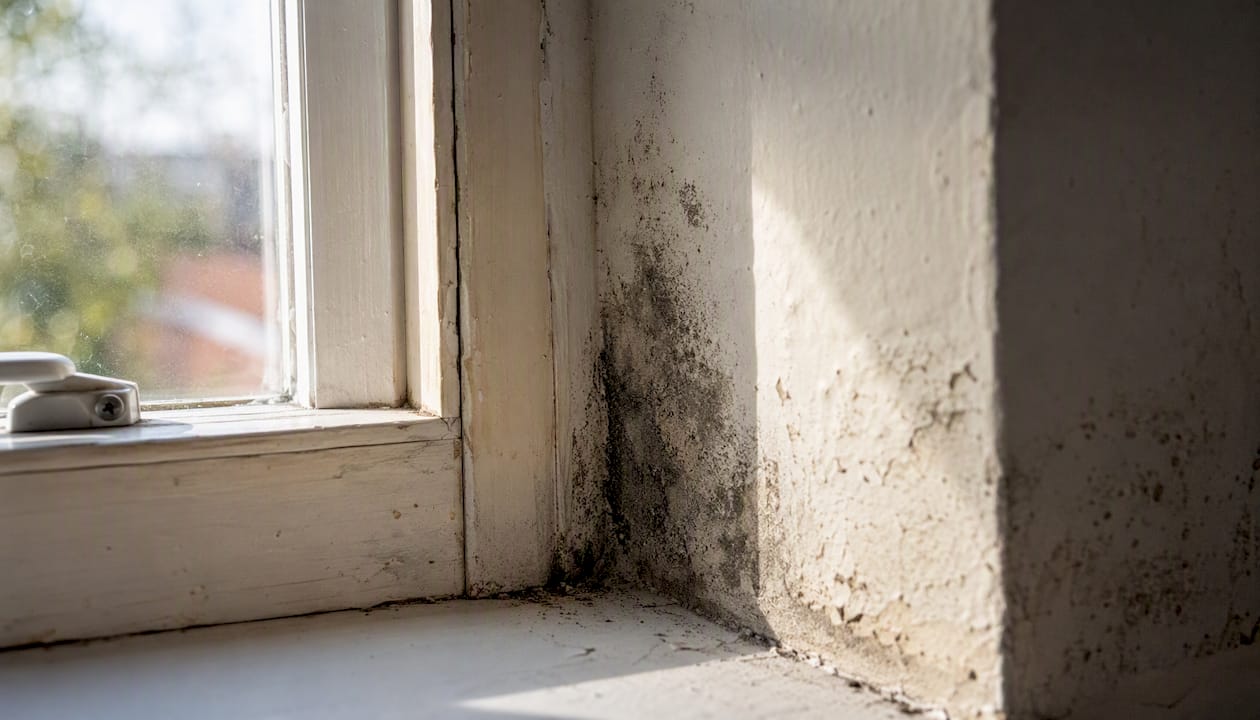
Mould on window reveals is almost always a condensation problem, and the first three things to do are straightforward: open the window to ventilate the room, wipe away any visible moisture with a dry cloth, and clean small patches on non-porous surfaces with white vinegar applied with a stiff brush. For most UK homes in winter, that combination deals with the immediate symptom. The harder question is why the mould appeared in the first place, and that is where this guide focuses.
Act immediately if you see any of the following — these are signs to stop DIY and book a professional survey:
- Water staining that tracks down the wall below the window sill
- Mould patches larger than roughly 30 cm across, or patches that return within a few weeks of cleaning
- Soft, damp, or discoloured plaster inside the reveal or behind the window board
- A persistent musty smell even after cleaning and ventilating
- Mould appearing in multiple rooms simultaneously
Safety note before you start cleaning: wear disposable gloves, eye protection, and an FFP2 face mask if the growth is heavy or dusty. Move children, elderly people, and anyone with asthma or a respiratory condition out of the room before you begin. Black mould health risks are well documented, and the WHO guidance on indoor damp and mould is clear that vulnerable occupants should not be present during cleaning.
Key takeaways
Mould on window reveals is almost always a condensation or cold-bridge problem, and cleaning without addressing the moisture source will not produce a lasting result.
| Point | Details |
|---|---|
| Diagnose before you clean | Check timing, location, and external pointing to distinguish condensation from penetrating damp before treating. |
| PPE is non-negotiable | Wear gloves, eye protection, and an FFP2 mask; move vulnerable occupants out of the room before cleaning. |
| Material matters | Silicone and timber need different treatment to uPVC; heavily stained sealant should be replaced, not just cleaned. |
| Prevention targets the source | Trickle vents open year-round, background heating overnight, and a correctly sized dehumidifier stop most condensation mould from returning. |
| Quaypointplastering offers survey-led fixes | A written report, defined scope, and workmanship guarantee across Dorset, Hampshire, and Wiltshire — book a survey when DIY has not resolved the problem. |
Table of Contents
- Why does mould form on window reveals?
- How to diagnose the cause: condensation, ingress, or cold bridge?
- How to remove mould from window reveals safely
- How to prevent mould returning on window reveals
- When should you call a professional for window-reveal mould?
- What does it cost and how long does it take?
- How a survey-led approach resolves window-reveal mould: an illustrative case
- The mistake most homeowners make with window-reveal mould
- Guaranteed, survey-led mould diagnosis across Dorset, Hampshire, and Wiltshire
- Sources
Why does mould form on window reveals?
Window reveals — the internal faces of the wall that frame a window opening — are one of the most common locations for mould in UK homes, and the reason is straightforward physics. The reveal is where the warm, humid indoor air meets one of the coldest parts of the external wall. When that surface temperature drops below the dew point of the indoor air, moisture condenses on it. Mould follows within days.
The core principle: mould on a window reveal is a symptom of a moisture control problem, not a cosmetic issue. Treating only the visible growth without changing ventilation or surface temperature typically leads to recurrence, sometimes within weeks.
Condensation and indoor humidity
The main driver in most UK homes is condensation. Everyday activities generate far more moisture than most people realise. Drying a load of washing indoors releases roughly 2 litres of water vapour into the air. Cooking, showering, and even breathing add to that load. In a well-sealed modern home with inadequate ventilation, that moisture has nowhere to go except onto the coldest surfaces — and reveals, particularly at the corners where the wall meets the frame, are reliably the coldest spots.
Condensation is most pronounced in winter because the temperature differential between inside and outside is greatest. Even small amounts of condensation are sufficient to sustain mould growth, so you do not need to see pooling water for the problem to be active.
Thermal bridging at reveals and lintels
A cold bridge occurs where a material with high thermal conductivity runs through the insulation layer of a wall. At window reveals, this is common at concrete or steel lintels, at poorly insulated block reveals, and at the junction between the window frame and the surrounding masonry. The surface above and around the frame cools disproportionately, creating a localised cold spot even when the rest of the wall is adequately insulated. Internal wall insulation solutions can address this, but only after the root cause has been confirmed.
Penetrating damp from frame gaps or poor pointing
Not all window-reveal mould is condensation. If external pointing around the frame has cracked or eroded, or if the mastic seal between the frame and the masonry has failed, rainwater can track into the cavity and emerge on the internal reveal. This is penetrating damp, and it behaves differently from condensation: it tends to appear after rain rather than overnight, it may produce a tidemark or salt staining, and it often affects the lower part of the reveal or the sill rather than the upper corners.
Airtightness upgrades without ventilation improvements
When older, draughty homes have new double glazing fitted, condensation often migrates from the glass surface to the reveals and wall junctions. The glazing upgrade reduces draughts, which raises indoor humidity, and the reveals become the new cold spot. Whole-house ventilation assessment should accompany glazing upgrades for exactly this reason. Increased airtightness without adequate ventilation consistently shifts condensation onto reveals and frames.
The WHO guidance on indoor air quality notes that prolonged damp and mould exposure carries real health risks, particularly for children, the elderly, and people with respiratory conditions. That is worth keeping in mind when deciding whether to treat the symptom or investigate the cause.
How to diagnose the cause: condensation, ingress, or cold bridge?
Before you clean anything, spend five minutes running these checks. The answers will tell you whether DIY removal is sensible or whether a professional survey is the correct next step.
Signs and likely causes
| Sign you observe | Most likely cause |
|---|---|
| Misted glass and moisture on the frame in the morning | Condensation (high indoor humidity) |
| Black specks on silicone sealant at the frame edge | Condensation, possibly combined with a cold bridge |
| Mould confined to upper corners of the reveal | Thermal bridging at the lintel |
| Staining or damp patch below the sill | Penetrating damp or failed external seal |
| Musty smell even in dry weather | Mould established behind plaster or in the reveal cavity |
| Mould worse in winter only, absent in summer | Condensation (seasonal temperature differential) |
| Mould present year-round regardless of weather | Penetrating damp or structural moisture source |
Quick decision flow
Work through these checks in order:
- Touch the reveal surface on a cold morning. If it feels cold and slightly damp but the wall elsewhere is dry, condensation is the primary suspect.
- Check the timing. Mould that appears or worsens only in winter and overnight points strongly to condensation. Mould that appears or worsens after rain points to penetrating damp.
- Inspect the location. Mould confined to the inner reveal and upper corners suggests a cold bridge. Mould tracking down from the sill or appearing on the lower reveal suggests water ingress.
- Check the trickle vent. Open it fully and leave it open for 48 hours. If the condensation reduces noticeably, ventilation is a significant factor.
- Inspect the external pointing and mastic seal. Look from outside for cracked mortar around the frame, gaps between the frame and masonry, or failed sealant. Any visible gap is a potential ingress point.
- Smell the reveal. A persistent musty odour after the surface has dried suggests mould is established deeper than the visible surface.
If the checks point clearly to condensation and the affected area is small, DIY removal is reasonable. If any sign points to penetrating damp, a structural cold bridge, or mould behind the plaster, the RICS consumer guidance on damp and mould recommends professional assessment before attempting remediation.
How to remove mould from window reveals safely
A commonly recommended household method for initial mould removal is white vinegar and baking soda applied with a stiff brush, followed by rinsing. This works well for small areas on non-porous surfaces. Persistent or widespread growth should prompt a professional diagnostic survey to identify root causes.
PPE and preparation
- Wear disposable nitrile gloves, safety glasses, and an FFP2 mask (FFP3 if the growth is heavy or you are sanding).
- Move vulnerable occupants out of the room.
- Open the window fully before you start.
- Lay an old towel or sheet of plastic on the floor below to catch drips and contaminated debris.
General sequence for small areas
- Dry the surface first with a clean cloth. Do not spread moisture further.
- Apply undiluted white vinegar to the affected area using a spray bottle or cloth. Leave it to dwell for 10–15 minutes.
- Sprinkle a small amount of bicarbonate of soda onto the area and scrub with a stiff brush.
- Wipe away the residue with a damp cloth, then dry the surface thoroughly.
- Dispose of cloths and brushes in a sealed bag immediately. Do not rinse them in the sink and leave them.
- Monitor the area over the following two weeks. If mould returns, the moisture source has not been resolved.
Material-specific instructions
uPVC frames and reveals uPVC is non-porous and the easiest surface to clean. The vinegar and bicarbonate method works well. For stubborn staining, a diluted solution of washing-up liquid applied with a soft cloth is sufficient. Avoid abrasive pads, which scratch the surface and create microscopic grooves where mould can re-establish. Dry the surface completely after cleaning.

Silicone sealant Silicone is porous at a microscopic level and mould penetrates the surface rather than sitting on top of it. If the sealant is lightly affected, the vinegar method may reduce visible growth, but the mould is likely to return. If the sealant is heavily stained or has been affected more than once, remove it entirely. Use a silicone remover tool or a craft knife to cut away the old bead, clean the substrate underneath, allow it to dry fully (at least 24 hours), and apply fresh silicone. Dwell time for the vinegar treatment on sealant: 20–30 minutes before scrubbing.
Timber reveals and frames Timber requires more care. Clean the surface with the vinegar method, then assess the wood beneath. Press the surface firmly with a screwdriver or fingernail: if it yields or feels soft, the timber has begun to rot and cleaning alone is not sufficient. Soft or spongy timber needs a timber survey to assess the extent of decay before any treatment. If the timber is sound, allow it to dry completely over several days, sand lightly to remove stained surface fibres, and repaint with a mould-resistant primer and topcoat. Do not repaint damp timber.
Painted plaster reveals Clean the surface with the vinegar method and allow it to dry fully, which may take several days in a cold room. Do not redecorate until moisture readings confirm the substrate is dry. Painting over damp plaster traps moisture and accelerates further mould growth. If the plaster feels soft, sounds hollow when tapped, or shows salt crystallisation (efflorescence), it needs professional assessment before any remediation.
Pro Tip: To avoid spreading spores during cleaning, work from the outer edge of the affected area inward. Use a fresh section of cloth for each wipe rather than dragging the same cloth back and forth across the growth.
How to prevent mould returning on window reveals
Treating visible mould without fixing the moisture source is temporary. The following measures address the root causes and are listed in order of impact for most UK homes.
Ventilation first
Open trickle vents and leave them open year-round, including in winter. The heat loss from a trickle vent is negligible compared with the cost of repeated mould remediation. Run bathroom and kitchen extractor fans during and for at least 15 minutes after cooking or bathing. A short daily purge — opening two windows on opposite sides of the house for 5–10 minutes — flushes humid air out effectively and costs nothing.
Avoid drying washing on radiators or airers in poorly ventilated rooms. If you have no outdoor drying option, use a vented tumble dryer or confine indoor drying to a room with a window open and an extractor fan running.
Background heating in winter
A house that cools significantly overnight creates the conditions for condensation every morning. Maintaining a low background temperature — around 16–18°C overnight — keeps wall and reveal surfaces above the dew point of normal indoor air. Turning the heating off entirely in cold weather and then reheating sharply in the morning is one of the most reliable ways to generate condensation on reveals.
Dehumidifiers
For rooms where ventilation is limited, a correctly sized dehumidifier is more effective than passive moisture absorbers. Dehumidifiers are recommended over passive absorbers for consistent moisture control, particularly in bedrooms and living rooms where windows cannot always be left open. Match the unit’s capacity to the room size: a small bedroom needs a unit rated at around 10–12 litres per day; a larger open-plan space needs proportionally more. Empty and clean the reservoir regularly.

Insulation and thermal-bridge fixes
If mould recurs at the same reveal despite good ventilation habits, the surface is likely too cold for condensation to be avoided by ventilation alone. Localised reveal insulation, lintel insulation, or an internal wall insulation system can raise the surface temperature above the dew point. These measures should be scoped as part of a professional survey, not installed speculatively, because the wrong insulation detail can shift the condensation problem to a different location.
Pro Tip: In bedrooms, keep blinds or curtains slightly open overnight rather than drawn fully closed. Closed blinds trap cold air against the glass and reveal, accelerating condensation. A small gap allows warm room air to circulate across the surface.
Understanding why black mould keeps returning often comes down to one or two persistent habits rather than a structural fault. Addressing those habits first is always the lowest-cost intervention.
When should you call a professional for window-reveal mould?
Some situations are beyond the scope of DIY cleaning, and attempting to treat them without a proper diagnosis risks masking a deteriorating problem. The following signs mean you should book a professional survey rather than reach for the vinegar.
Stop DIY and arrange a survey if you observe:
- Mould or damp staining that tracks below the window sill onto the wall
- Any mould patch that returns within four weeks of thorough cleaning
- Soft, hollow, or salt-stained plaster inside the reveal
- Timber that feels soft or spongy when pressed
- Mould appearing in multiple rooms or at multiple windows
- A persistent musty smell that does not clear with ventilation
- Visible gaps in external pointing or failed mastic around the frame
What a professional survey involves
A properly conducted damp and mould survey is not a visual inspection with a clipboard. It includes moisture meter readings taken at multiple points across the reveal, wall, and surrounding surfaces; thermal imaging where appropriate to identify cold bridges that are not visible to the naked eye; a written report documenting findings with photographs; and a recommended scope of remedial work with a timeline and cost. The RICS consumer guidance sets out what homeowners should expect from a professional assessment.
Post-remediation verification
Once remedial work is complete, independent post-remediation verification (PRV) confirms that the work has succeeded. PRV checks that visible mould has been removed, that moisture levels have normalised, and that air or surface samples meet clearance criteria where applicable. The AIHA guideline on assessment, remediation, and post-remediation verification is the accepted professional reference for establishing these procedures.
A key principle in professional remediation: the party that carries out the cleaning should not be the same party that verifies the result. Independent post-remediation verification removes the conflict of interest and gives homeowners objective assurance that the work is complete and the moisture source has been resolved.
Ask any contractor for a written guarantee on their workmanship and a written scope of works before they start. A contractor who declines to provide either is worth treating with caution.
What does it cost and how long does it take?
The figures below are indicative and region-dependent. Actual costs vary with the extent of the problem, access, and the materials involved.
DIY cleaning (small area, surface mould only): Materials cost under £10. Time: 1–2 hours including drying and monitoring setup. This is appropriate only where the cause is confirmed as condensation and the affected area is small and non-porous.
Resealing or local repair (failed mastic, isolated sealant replacement): A tradesperson typically charges £80–£200 for a single window, depending on access and the extent of the seal failure. Time: half a day to one day, plus 24 hours for the sealant to cure.
Survey plus structural remedial work (cold bridge, penetrating damp, plaster reinstatement): Costs vary considerably depending on scope. A diagnostic survey typically costs £150–£350. Remedial works — which may include localised insulation, render repair, replastering, or timber treatment — are scoped and priced individually after the survey findings are documented. Drying times after treatment can extend the overall programme to 1–4 weeks depending on the substrate and the season.
When requesting quotes, ask for: a written diagnostic report with moisture readings, a defined scope of works, a timeline, and a written workmanship guarantee. A quote without these elements does not give you the information you need to compare contractors fairly or to hold them to account if the problem recurs.
How a survey-led approach resolves window-reveal mould: an illustrative case
The following is an anonymised description of the type of case Quaypointplastering regularly encounters across Dorset, Hampshire, and Wiltshire.
The presenting symptoms: a homeowner in a 1970s semi-detached property noticed recurring black mould on both internal reveals of the main bedroom window. The mould had been cleaned three times over two winters using household products, returning each time within four to six weeks.
Diagnostic checks carried out:
- Moisture meter readings across the reveal, lintel, and surrounding wall confirmed elevated moisture at the lintel and upper reveal, with normal readings lower down
- Thermal imaging identified a pronounced cold bridge at the concrete lintel, where surface temperatures were consistently 3–4°C below the adjacent wall
- External inspection confirmed the mastic seal was intact and pointing was sound, ruling out penetrating damp
- Indoor humidity monitoring over 48 hours showed relative humidity regularly exceeding 70% in the bedroom, driven partly by an unvented tumble dryer in the adjacent utility room
Root cause identified: a combination of thermal bridging at the lintel and elevated indoor humidity. Neither factor alone would have caused the persistent mould; together, they created conditions the surface could not recover from between cleaning cycles.
Remedial steps taken:
- Localised insulation applied to the reveal and lintel to raise surface temperatures
- Ventilation advice provided: the tumble dryer was rerouted to vent externally, and trickle vents were cleared and left open
- Affected plaster removed, substrate treated, and replastered with a breathable finish
- Written report with photographs provided to the homeowner, along with a defined scope of works and a workmanship guarantee
Outcome: post-remediation moisture readings confirmed the substrate had dried to acceptable levels. The homeowner received a written guarantee covering the remedial works.
Quaypointplastering covers Dorset, Hampshire, and Wiltshire, and the advantage of a local specialist is straightforward: follow-up visits, if needed, are practical rather than theoretical. A written guarantee from a contractor who operates locally carries real weight.
The mistake most homeowners make with window-reveal mould
The single most common error is cleaning the mould and stopping there. It is understandable: the visible growth disappears, the room looks better, and the problem appears solved. But if the surface temperature at the reveal is still below the dew point of the indoor air, and if the humidity source has not changed, the mould will return. Often within weeks.
The corrective habit is simple but requires a shift in how you think about the problem. Before you clean, spend five minutes on the diagnostic checks in this guide. Identify whether the cause is condensation, a cold bridge, or ingress. If it is condensation, address the humidity source and the ventilation before you pick up a cloth. If it is a cold bridge, understand that cleaning alone will not resolve it. If there is any sign of ingress, stop and get a survey.
Cleaning is not remediation. It is maintenance. Remediation means identifying and fixing the moisture source so that the surface stays dry without ongoing intervention, preventing mould from returning.
Guaranteed, survey-led mould diagnosis across Dorset, Hampshire, and Wiltshire
Quaypointplastering offers something most general builders do not: a diagnostic-first approach where no remedial work is recommended until the cause has been confirmed with moisture readings, thermal imaging where appropriate, and a written report. That means you receive a documented scope of works, a timeline, and a written guarantee before anything is touched.

The service covers damp and mould surveys, penetrating damp investigations, black mould removal, timber assessment, and full plastering reinstatement across Dorset, Hampshire, and Wiltshire. Post-remediation verification is part of the process, not an afterthought. With over 35 years of local experience and a track record of positive client outcomes, Quaypointplastering is the specialist to call when cleaning has not worked and you need to know why. Book a survey at Quaypointplastering or call to arrange a visit at a time that suits you.
Sources
- How to get rid of mould around your windows
- Black mould around windows: why it keeps coming back and the habit that stops it
- World Health Organization (WHO)
- Assessment, Remediation, and Post-Remediation Verification of Mold in Buildings, 2nd edition
- Damp and mould (RICS consumer guide)
- Post-remediation verification (SCRT)
This article is general information, not a substitute for advice from a qualified doctor. Consult a qualified healthcare professional about your own circumstances before acting on anything here.