
The mould remediation process: what homeowners should expect
The mould remediation process: what homeowners should expect
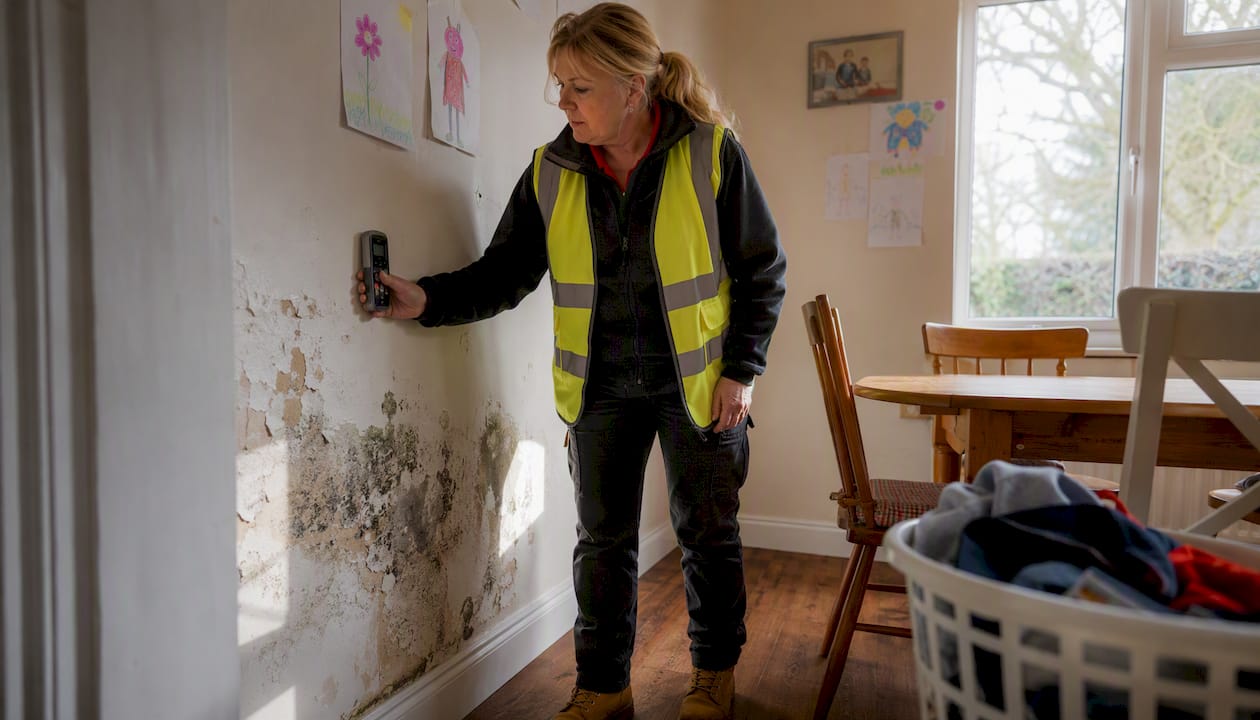
The mould remediation process is a survey-led, health-and-safety-first sequence covering inspection, moisture source correction, containment, physical removal, cleaning, structural drying, and post-remediation verification (PRV). It is not a cosmetic clean. Done properly, it follows the framework set out in ANSI/IICRC S520, the industry consensus standard for professional mould remediation, and it ends only when independent testing confirms the space has returned to a normal fungal ecology.
If you have found mould in your property, here is what to do right now:
- Document it. Photograph the affected area before touching anything, noting the approximate size and any visible moisture.
- Limit access. Keep children, elderly occupants, and anyone with respiratory conditions away from the area.
- Do not disturb it. Scrubbing or painting over mould without containment spreads spores to unaffected rooms.
- Book a diagnostic survey. A moisture survey establishes why the mould grew, which is the only way to prevent it returning.
Quaypointplastering carries out survey-led damp and mould investigations across Dorset, Hampshire, and Wiltshire, producing documented findings, a defined scope of works, and written guarantees before any treatment begins.
Table of Contents
- What commonly causes mould in UK homes?
- How does the professional mould remediation process work, step by step?
- When is DIY treatment acceptable, and when should you hire a professional?
- How long does remediation take, and what does it cost in the UK?
- What should occupants do before, during, and after remediation?
- How is remediation success verified?
- How do you prevent mould from coming back?
- Quaypointplastering’s survey-led approach: what we do and what we guarantee
- Key takeaways
- Book a damp and mould survey with Quaypointplastering
- Useful sources and further reading
What commonly causes mould in UK homes?
Mould needs moisture to grow. In UK housing, that moisture almost always traces back to one of a small number of structural or behavioural causes, and identifying the correct one is the difference between a permanent fix and a recurring problem.
Common causes in UK homes:
- Rising damp — groundwater wicking upward through masonry where the damp-proof course has failed or was never installed.
- Penetrating damp — rainwater entering through defective render, pointing, flashings, or window seals. You can read more about identifying the cause before calling a surveyor.
- Persistent condensation — warm, moisture-laden air meeting cold surfaces, most common in poorly ventilated bathrooms, kitchens, and bedrooms with inadequate heating.
- Leaks — plumbing failures, roof defects, or overflowing gutters that introduce water into wall cavities or floor voids.
- Poor ventilation — inadequate extract fans, blocked air bricks, or sealed chimneys that trap humid air indoors.
Surface mould vs. contamination that needs remediation
A small patch of condensation mould on a bathroom tile grout is not the same problem as black mould spreading across a bedroom wall behind furniture. The distinction matters because the response is different. Surface mould on a non-porous, hard surface that has appeared once and has a clear condensation cause can sometimes be addressed with improved ventilation and careful cleaning. Contamination that has penetrated porous materials such as plasterboard, timber, or insulation requires professional remediation.
Call a professional when you see any of these:
- Growth covering more than a small patch.
- Mould on porous materials: plasterboard, timber, carpets, or soft furnishings.
- Recurrence within weeks of cleaning, which signals an unresolved moisture source.
- A persistent musty smell even where no visible growth is present, suggesting hidden growth inside a wall cavity or floor void.
- Occupants experiencing respiratory symptoms, headaches, or worsening asthma that correlate with time spent in the property.
- Any growth following a flood, leak, or period of water ingress.
The EPA’s mould guidance is clear: cleaning without correcting the moisture source will almost always lead to recurrence. That principle underpins every professional remediation.
Pro Tip: Take dated photographs from multiple angles before calling a surveyor. Note whether the mould is on an external wall, an internal partition, or a ceiling, and whether it appeared after a specific weather event or gradually over time. This information shortens the diagnostic visit considerably.
How does the professional mould remediation process work, step by step?
Professional remediation follows a defined sequence. Skipping steps, particularly moisture assessment or post-remediation verification, is one of the most reliable predictors of recurrence. Here is what a compliant, S520-aligned job looks like from start to finish.
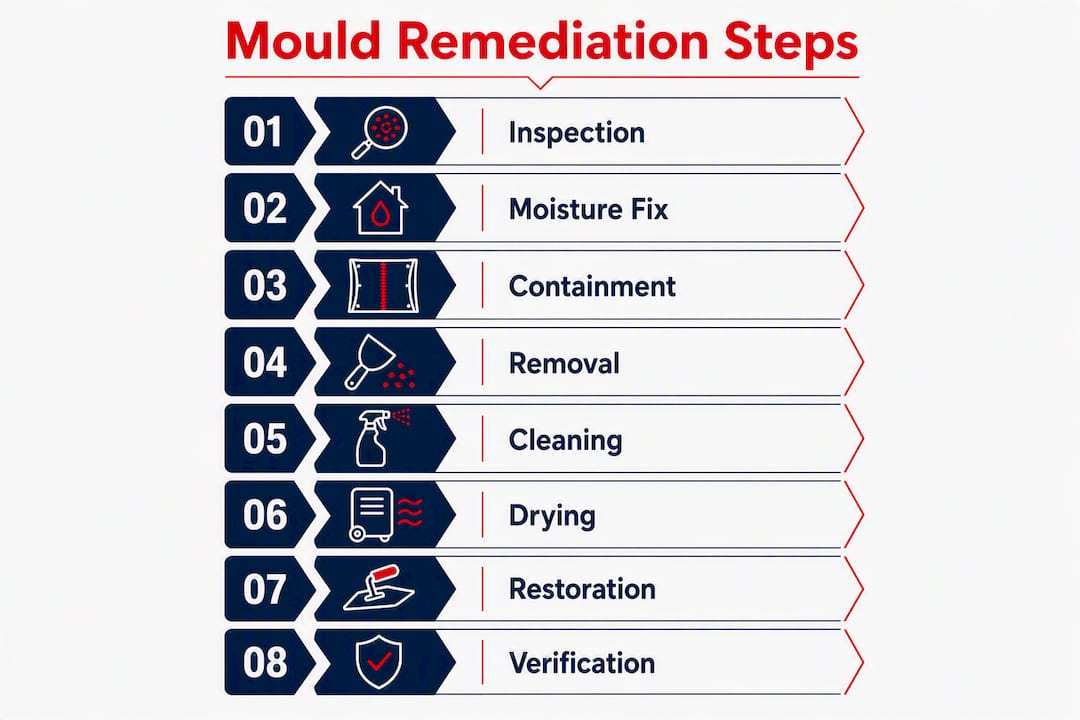
Step 1: Inspection and moisture source identification
A surveyor visits the property, conducts a visual inspection, and uses moisture meters, hygrometers, and thermal imaging to map moisture distribution. The goal is to establish the contamination condition (Condition 1 is normal; Condition 3 is heavily contaminated) and identify the moisture pathway. No remediation work begins until this is complete and documented.
Step 2: Moisture source correction
Before any mould is touched, the source of moisture must be addressed. This might mean repairing a roof, injecting a damp-proof course, improving extract ventilation, or fixing a plumbing leak. Remediation that proceeds without this step will fail.
Step 3: Containment and engineering controls
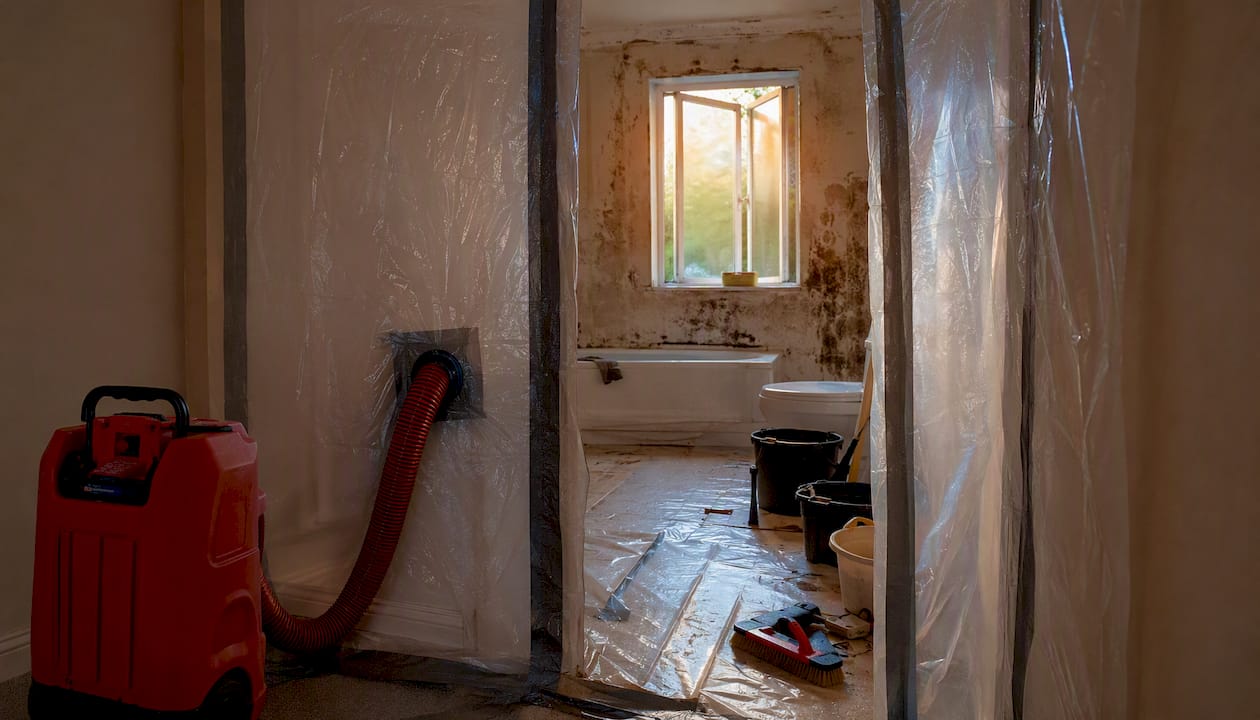
The work area is isolated using polyethylene sheeting and sealed with tape. A negative air machine fitted with HEPA filtration creates negative pressure inside the containment zone, so that air flows in rather than out. This prevents spores from migrating to clean areas of the property. EPA guidance specifically identifies engineering controls and containment as the primary means of protecting building occupants during active remediation.
Step 4: Removal of contaminated materials
Porous materials that cannot be decontaminated, such as affected plasterboard, insulation, and soft furnishings, are removed and double-bagged in 6-mil polyethylene sheeting before being taken out of the containment zone. ANSI/IICRC S520 is explicit: physical source removal is the fundamental remediation method. Chemical treatments are supplemental and must not replace it.
Step 5: Cleaning and decontamination
Remaining structural surfaces are HEPA-vacuumed to remove loose spore material, then damp-wiped or scrubbed with appropriate cleaning agents. Antimicrobial treatments may be applied after cleaning, not instead of it. HEPA vacuums are also used to clean settled dust on surfaces outside the containment zone.
Step 6: Structural drying and dehumidification
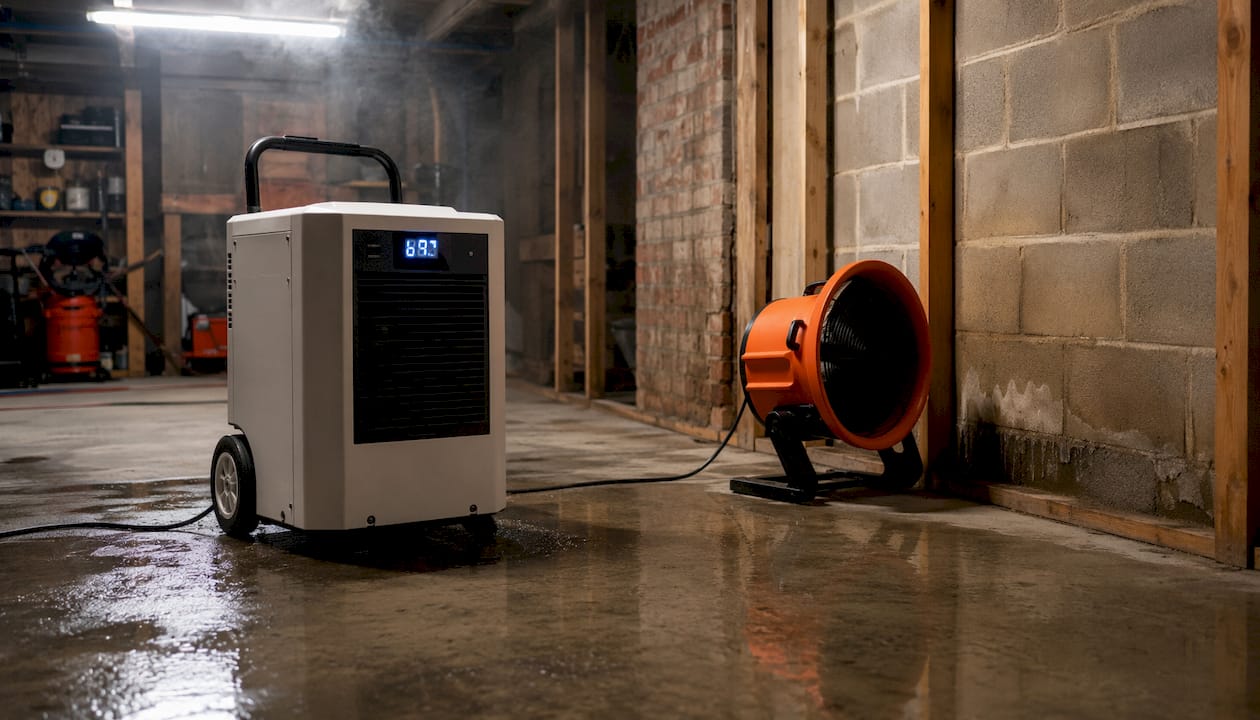
Commercial dehumidifiers and air movers are deployed to bring structural moisture content down to target levels. Moisture readings are logged daily. This phase can take several days depending on the extent of saturation and the building materials involved.
Step 7: Structural restoration and reinstatement
Once moisture targets are met and the space has passed visual inspection, structural repairs begin: re-plastering, boarding, redecorating, or timber replacement as required by the scope of works.
Step 8: Post-remediation verification (PRV)
An independent inspector carries out PRV, which includes visual inspection, moisture mapping, and air or surface sampling sent to an accredited laboratory. The result is a clearance report confirming the space has returned to Condition 1. Occupants should not re-enter the remediated area until PRV is complete and clearance is confirmed.
Typical job durations (sourced from RestoreAdvisor):
- Small, contained jobs: 1–2 days
- Medium jobs: 2–4 days
- Large jobs: 4–7 days
- Extensive or structural jobs: 1–2 weeks or more
- Re-entry after PRV: typically 24–48 hours after clearance
Equipment used on a compliant job:
- Moisture meters and pin/pinless probes for structural readings
- Thermal imaging camera for hidden moisture mapping
- Negative air machines with HEPA filtration
- Commercial dehumidifiers and air movers
- HEPA vacuums for spore removal
- Polyethylene sheeting and tape for containment
Pro Tip: Before signing any contract, ask the contractor for a written scope of works that includes pre-remediation moisture readings, a description of containment measures, and confirmation that PRV will be carried out by an independent inspector. A contractor who offers to do their own clearance testing is a red flag.
On fogging: Fogging or misting is widely marketed as a non-invasive mould treatment. Industry standards and specialist commentary are consistent: fogging does not remove mould biomass or mycotoxins from porous materials. At best, it is a finishing step applied after physical removal and cleaning. It is not a substitute for remediation.
When is DIY treatment acceptable, and when should you hire a professional?
The honest answer is that DIY is appropriate only in a narrow set of circumstances. For most UK homeowners dealing with recurring or widespread mould, professional involvement is the safer and more cost-effective route.
When DIY may be acceptable
- The affected area is small, limited to a small patch on a non-porous surface such as glazed tiles or a painted wall.
- The moisture source is clearly identified and already resolved (for example, a dripping tap that has been fixed).
- No occupant is vulnerable: no young children, elderly residents, or anyone with asthma, allergies, or a compromised immune system.
- The mould has not recurred after a previous clean.
Even in these cases, wear an FFP2 or FFP3 respirator, nitrile gloves, and eye protection. Work in a ventilated space and bag all cleaning materials immediately after use.
When to call a professional remediator
- The affected area exceeds 1 square metre, or you cannot determine its full extent.
- Mould is on or inside porous materials: plasterboard, timber joists, floor boards, insulation, or carpets.
- You cannot identify or access the moisture source.
- The mould has returned after previous cleaning attempts.
- Any occupant is experiencing health symptoms that may be linked to mould exposure.
- The property has had a flood, a roof leak, or any sustained water ingress.
Risks of DIY on a job that needs professional remediation:
- Disturbing mould without containment spreads spores to previously unaffected rooms.
- Fogging or spray treatments without physical removal leave mycotoxins in place.
- Hidden growth inside wall cavities or beneath flooring is missed entirely.
- No independent PRV means you have no documented evidence the problem is resolved.
If you are unsure which category your situation falls into, a diagnostic survey is the most efficient way to find out. Quaypointplastering’s condensation and black mould page covers the most common domestic scenarios in detail.
How long does remediation take, and what does it cost in the UK?
Timelines and costs vary considerably depending on the extent of contamination, the materials affected, access constraints, and whether structural repairs are required. The table below gives indicative ranges for domestic jobs in the UK.
| Job size | Typical duration | Indicative UK cost range | What drives the price |
|---|---|---|---|
| Small (under 1 sq m, non-porous) | 1–2 days | — | Surface area, access, PPE and disposal |
| Medium (1 sq m, some porous material) | 2–4 days | — | Material removal, dehumidification, PRV |
| Large (multiple rooms or structural) | 4–7 days | — | Structural repairs, reinstatement, extended drying |
| Extensive (flood damage, whole-floor) | 1–2+ weeks | — | Full containment, laboratory PRV, full reinstatement |
Cost ranges are indicative for UK domestic properties and will vary by region, contractor, and scope. Always obtain a written quotation.
A transparent quotation should include:
- A diagnostic survey report with moisture readings and photographs.
- A defined scope of works listing materials to be removed and methods to be used.
- Clarity on who is responsible for correcting the moisture source (contractor or homeowner).
- Equipment to be deployed and estimated drying targets.
- PRV arrangements, including whether an independent inspector will be used.
- Written guarantees on workmanship.
Statistic: RestoreAdvisor reports that small contained jobs typically complete in 1–2 days, with re-entry 24–48 hours after successful PRV clearance. Larger structural jobs run 1–2 weeks or more.
What should occupants do before, during, and after remediation?
Occupant safety is the remediation manager’s highest priority, and there are practical steps you can take to support a safe, efficient job.
Before work begins:
- Move personal belongings, clothing, and soft furnishings away from the work area.
- Inform all household members, particularly anyone with health vulnerabilities, about the planned works and timeline.
- Photograph the area yourself for your own records.
- Identify and note any HVAC vents, air bricks, or ventilation points near the work zone so the contractor can seal them during active works.
During active remediation:
- Do not enter the containment zone. A properly set-up job will have a decontamination entry and exit point; only authorised workers with PPE should cross it.
- Expect the negative air machine to run continuously. The sound is normal and indicates the containment is working.
- The contractor should seal HVAC ducts and air handling units within the containment zone to prevent spore migration through ductwork.
- Ask for a brief daily update on moisture readings and progress. A professional contractor will have no objection to sharing this.
After remediation and PRV:
- Re-enter only after the independent PRV report confirms clearance. Do not accept a verbal assurance in place of a written report.
- Ventilate the reinstated space gradually before returning furnishings.
- Keep the PRV report and written guarantee in a safe place; you will need them if you sell the property or if a recurrence is disputed.
How is remediation success verified?
Post-remediation verification is the documented proof that the job is complete. Its purpose is to confirm the space has returned to Condition 1: a normal fungal ecology comparable to an unaffected reference area in the same building.
PRV should include:
- Visual inspection — no visible mould growth, no residual moisture staining, and all contaminated materials removed.
- Moisture mapping — readings at multiple points confirming structural moisture content is within target range.
- Air sampling — spore trap or cassette samples taken inside the remediated area and compared to an outdoor or unaffected indoor reference sample.
- Surface sampling — tape lifts or swabs from structural surfaces, sent to an accredited laboratory.
- Photographic evidence — dated photographs of all sampling locations and final conditions.
- Signed clearance certificate — a written document confirming the above results meet the clearance criteria.
Independence matters. Where full containment and demolition have occurred, PRV should be carried out by an inspector who was not involved in the remediation work. A contractor clearing their own job is one of the industry red flags most commonly associated with recurrence. Ask for the name and accreditation of the PRV inspector before works begin.
How do you prevent mould from coming back?
Remediation removes the existing problem. Prevention stops it returning. The two are only effective together, and the prevention plan should be agreed before the contractor leaves site.
Maintenance checklist:
- Fix any remaining leaks, defective pointing, or drainage issues promptly.
- Maintain indoor relative humidity between 40% and 60% using a simple hygrometer to monitor.
- Service extract fans in kitchens and bathrooms annually and replace filters as recommended.
- Keep trickle vents on windows open, particularly in bedrooms overnight.
- Inspect roof, gutters, and external render annually, ideally in autumn before the wet season.
Ventilation options:
Where persistent condensation is the root cause, mechanical ventilation is often the most reliable long-term solution. Positive Input Ventilation (PIV) introduces filtered, slightly pressurised air from the loft space, diluting humid indoor air and reducing condensation on cold surfaces. It is particularly effective in properties where occupant behaviour (cooking, drying laundry indoors, bathing) generates high moisture loads and where window ventilation alone is insufficient.
Behavioural changes that make a measurable difference:
- Dry laundry outdoors or in a vented tumble dryer rather than on radiators.
- Use extractor fans during and for at least 20 minutes after cooking or bathing.
- Maintain a consistent background heat rather than allowing rooms to cool completely overnight, which encourages condensation on cold surfaces.
- Leave a small gap between furniture and external walls to allow air circulation.
Pro Tip: A basic digital hygrometer costs under £15 and gives you a real-time relative humidity reading. Place one in any room that has previously had mould. If readings consistently exceed 70%, the ventilation or heating strategy needs attention before mould returns.
Quaypointplastering’s survey-led approach: what we do and what we guarantee
Quaypointplastering has spent over 35 years diagnosing and resolving damp, mould, and timber problems across Dorset, Hampshire, and Wiltshire. The process starts with a diagnostic survey, not a treatment recommendation, because the correct treatment depends entirely on understanding the moisture source.
What the survey includes:
- Visual inspection of all affected areas, including roof spaces, sub-floor voids, and external envelope where accessible.
- Moisture meter readings and thermal imaging to map moisture distribution and identify hidden pathways.
- Documented findings with photographs and moisture data.
- A written scope of works specifying what will be done, what materials will be removed, and what the expected outcome is.
- Written guarantees on workmanship, so you have recourse if the problem recurs within the guarantee period.
This approach aligns with the ANSI/IICRC S520 framework: survey and moisture mapping before any demolition, physical removal of contaminated materials, and documented verification before sign-off. It is the approach that separates a temporary fix from a permanent resolution.
Quaypointplastering covers damp and mould treatments from initial investigation through to plastering and reinstatement, with the same team managing the job from survey to sign-off. Landlords and property managers can also book a dedicated landlord damp and mould inspection to meet their obligations under current housing standards guidance.
To request a survey, call the team directly or use the contact form on the website. Bring your photographs, note any previous treatments, and be ready to describe when the problem first appeared and whether it has recurred.
Key takeaways
The mould remediation process only delivers lasting results when moisture is corrected first, contaminated materials are physically removed, and an independent inspector verifies clearance before re-entry.
| Point | Details |
|---|---|
| Survey before treatment | A moisture survey and documented scope must precede any remediation work to identify the source. |
| Physical removal is non-negotiable | Porous contaminated materials must be removed; fogging or chemical treatment alone will not resolve the problem. |
| Independent PRV required | Post-remediation verification by an independent inspector, including lab sampling, is the only defensible clearance. |
| Re-entry timing | Occupants should wait 24–48 hours after successful PRV clearance before returning to remediated areas. |
| Quaypointplastering | Survey-led damp and mould investigations across Dorset, Hampshire, and Wiltshire, with written guarantees and documented findings. |
Why survey-first is the only approach worth paying for
The pattern we see repeatedly in the field is straightforward: a property has been treated, sometimes more than once, and the mould has returned within months. When we survey those properties, the moisture source is almost always still active. A failed damp-proof course, a blocked cavity tray, a bathroom with no functional extract fan. The treatment addressed the symptom and left the cause untouched.
The industry has a standard for this. ANSI/IICRC S520 exists precisely because remediation without diagnosis is not remediation; it is decoration. Homeowners deserve to know that before they spend money on a treatment that will not hold.
The other thing worth saying plainly: demand moisture readings before and after any work, and insist on independent PRV. A contractor who is reluctant to provide either is telling you something about the quality of their process.
Book a damp and mould survey with Quaypointplastering
Quaypointplastering offers something straightforward: a thorough diagnostic survey, a written report with moisture data and photographs, and a clear scope of works before any treatment is agreed. No treatment is recommended without a survey first, and every job carries a written guarantee on workmanship.

The survey visit covers visual inspection, moisture mapping with calibrated meters and thermal imaging, and a documented assessment of the moisture source. You will leave the visit knowing exactly what the problem is, what needs to be done, and what it will cost. For properties in Dorset, Hampshire, and Wiltshire, this is the most direct route to a permanent mould solution.
Landlords and property managers can book a dedicated inspection to address their obligations under current housing standards. Homeowners dealing with black mould removal or persistent damp after rain will find the survey identifies the cause clearly, often in a single visit.
To book, call the team or submit an enquiry through the website. Have your photographs ready and note any previous treatments carried out on the property.
Useful sources and further reading
The claims in this article draw on the following authoritative references. Where a source is cited inline, the link appears in the relevant section above.
- ANSI/IICRC S520 (2024 edition) — the industry consensus standard for professional mould remediation, covering contamination conditions, source removal, containment, and documentation requirements.
- EPA: Mould Remediation in Schools and Commercial Buildings — the US Environmental Protection Agency’s detailed guidance on engineering controls, containment methods, PPE selection, and remediation planning. Widely referenced by UK practitioners for its technical depth.
- EPA: Mould Cleanup in Your Home — practical EPA guidance confirming that moisture control is the foundation of any successful remediation and that cleaning without source correction leads to recurrence.
- RestoreAdvisor: Mould Remediation Process — industry commentary on the eight-step S520-aligned sequence, timeline estimates by job size, and common contractor shortcuts that predict failure.
- UseFarsight: Fogging for Mould — specialist analysis of why fogging is not an accepted standalone remediation method and what it can and cannot achieve.
| Source | What it covers | Relevance to this article |
|---|---|---|
| ANSI/IICRC S520 (2024) | Full remediation standard: conditions, removal, documentation | Step-by-step process, PRV, scope of works |
| EPA Mould Remediation Guide | Engineering controls, containment, PPE | Occupant safety, containment methods |
| EPA Mould Cleanup (Home) | Moisture control as the key to prevention | Causes, prevention, recurrence |
| RestoreAdvisor Process Guide | Eight-step sequence, timelines, red flags | Step-by-step section, timeline table |
| UseFarsight Fogging Analysis | Fogging limitations vs physical removal | Fogging vs cleaning comparison |