
Avoid false fixes: quick loft condensation checks that work for UK homeowners
Avoid false fixes: quick loft condensation checks that work for UK homeowners
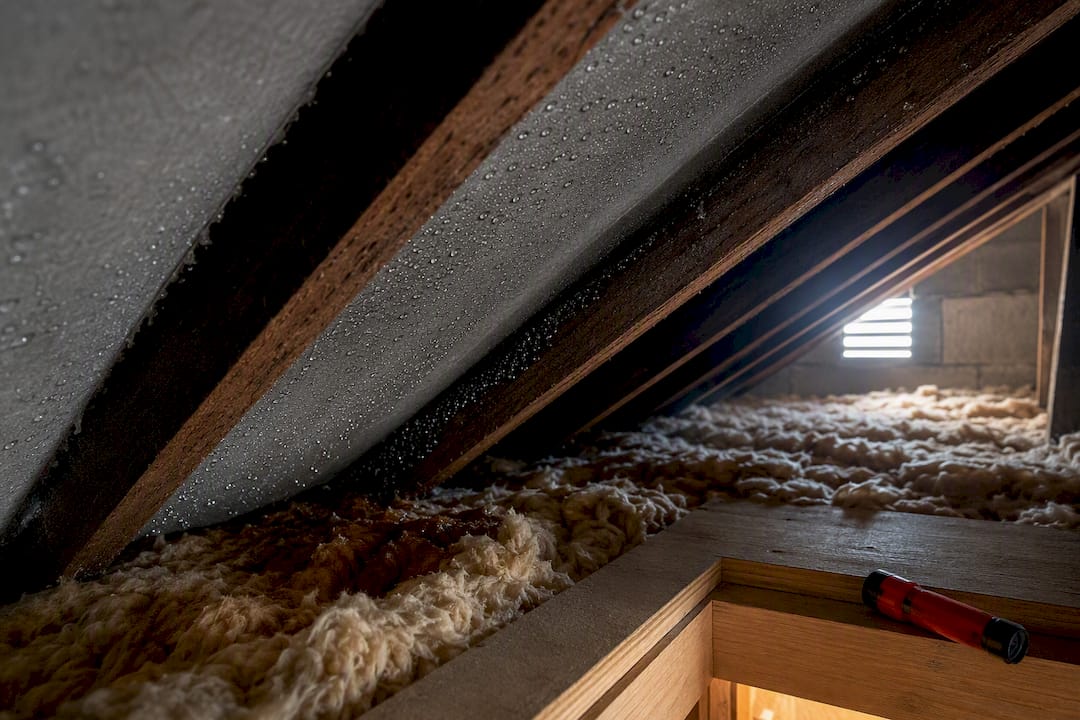
If your loft has wet felt, dripping, or mould, it is almost always warm, moist air from the house condensing on cold surfaces. Check the soffit vents for blockages, look for droplets on the underside of the felt, and photograph anything you find. Try the straightforward ventilation and sealing fixes first. Call a specialist only if timbers feel spongy or you hear active dripping.
TL;DR:
- Ensuring soffit and eaves vents are clear can significantly reduce moisture buildup caused by warm, moist house air leaking into the loft.
- Sealing gaps around the loft hatch, pipe penetrations, and downlights is critical for preventing warm, humid air from entering and causing condensation.
- Most moisture in lofts, around 80%, enters through air leakage points rather than diffusion, so focus on sealing all potential entry routes first.
- Persistent condensation beyond 18 to 24 months in a new build indicates a possible ventilation or construction defect rather than normal drying.
- A professional survey is recommended if damp timber, mould, or active dripping are present, as DIY fixes may not address underlying issues.
Table of Contents
- What causes a loft condensation problem?
- How serious is loft condensation, and what are the warning signs?
- How can I stop condensation in my loft? Practical fixes in order of impact
- What’s normal in a new build, and when is it a defect?
- When should you call a specialist for a loft survey?
- Quay Point Plastering’s survey-led approach to condensation
- Need a proper diagnosis? Here’s how Quay Point Plastering helps
- Sources
- FAQ
What causes a loft condensation problem?
Warm, moist air rises. That is the whole mechanism behind most loft condensation, but the detail matters if you want a fix that actually lasts.
Every household produces vapour constantly: cooking, showering, drying washing indoors, even breathing overnight. That moist air drifts upward through the house and finds its way into the loft through gaps most owners never think about, rather than passing through the ceiling material itself. Research on condensation in loft spaces puts the figure at around 80% of loft moisture arriving via air leakage rather than diffusion through plasterboard.

Once that air reaches the loft, it meets cold surfaces, most often the underside of the roof felt on a chilly morning, and hits its dew point. That is the temperature at which air can no longer hold its moisture as vapour, so it turns to liquid water on contact. Roof felt is usually the coldest surface up there, which is why it beads and drips first.
Two things make this worse in the 2020s than it was decades ago:
- Homes are better insulated and better sealed at wall and window level, which raises indoor humidity because less moisture escapes through draughts.
- New-build construction introduces a large volume of moisture from wet plaster, screed, and timber that has to dry out over many months.
Distinguishing condensation from an actual roof leak matters before you touch anything. A leak tends to appear after or during rain and follows a consistent path from a specific point of entry. Condensation, by contrast, tends to correlate with cold, clear mornings and appears across a wider area, not from one obvious spot, as explained in this guide to condensation dripping from roof felt.
How serious is loft condensation, and what are the warning signs?
Most loft condensation starts small and gets worse slowly, which is exactly why it catches people out. The early signs are easy to dismiss as “just a bit of damp up there.”
Look for these specific symptoms on your next loft visit:
- Fine droplets or a sheen of moisture on the underside of the roof felt
- Damp, compressed, or discoloured loft insulation, particularly near the eaves
- A musty smell as soon as you open the hatch
- White, powdery patches or bleached streaks on rafters, often mistaken for white-spot mould or even woodworm
- Staining or a soft patch on the bedroom ceiling directly below the loft
Around 80% of the moisture reaching a typical loft gets there through air leakage points, such as the hatch, downlights, and pipe gaps, rather than through the ceiling material itself, according to BS 5250 based research. That single fact should shape where you look first: seals and gaps, not just insulation thickness.
Left unaddressed, persistent condensation soaks insulation and reduces its effectiveness, and it creates the damp, cyclical wetting that timber rot needs to establish. Mould spores generated in a loft can migrate into living spaces through the same gaps the vapour used to get in.
Book a professional inspection without delay if timbers feel soft or spongy to the touch, if you can hear active dripping, or if mould coverage extends across large sections of roof structure rather than isolated spots.

How can I stop condensation in my loft? Practical fixes in order of impact
Fix the airflow first, then the moisture at its source, then the gaps. That order matters more than most DIY guides suggest, because tackling insulation before ventilation often makes things worse, not better.
- Clear the soffit and eaves vents. Insulation frequently gets pushed too far into the eaves during previous jobs, blocking the very vents meant to let air move through. Pull insulation back to leave a clear 50mm airflow gap at the eaves, a specification recommended in guidance on reducing loft condensation.
- Check for cross-flow ventilation. Air needs to enter at the eaves and exit near the ridge for a loft to ventilate properly. If your loft only has vents on one side, or none at all, that is worth raising with a roofer or during your next loft insulation work.
- Seal the loft hatch. An unsealed hatch is one of the biggest single air leakage paths into a loft. Fit a simple foam draught strip around the frame and make sure it closes firmly.
- Seal pipe and cable penetrations. Any gap where a soil pipe, cable, or old flue passes through the ceiling is a direct route for warm, moist air. Expanding foam or proper grommets close these off cheaply.
- Check recessed downlights. Standard downlights are rarely airtight and act as a constant vapour leak into the loft above. Fire-rated, sealed fittings solve this at the next rewire or refit.
- Confirm extractor fans vent outside, not into the loft. This is a genuinely common and avoidable mistake. Bathroom and kitchen extractors ducted into the loft space, rather than through the wall or roof to open air, dump vapour exactly where you the least want it. Fit a humidistat or timer-controlled fan and check the ducting run leads all the way outside.
- Consider the roof covering itself. Older non-breathable bitumen felt traps moisture against the cold underside and is strongly associated with the “indoor rain” effect on cold mornings. A breathable membrane allows vapour to diffuse outward and can reduce the need for high-level ventilation, though it is a reproofing-scale job, not a weekend fix.
Pro Tip: Don’t leave the loft hatch permanently open to “let the damp out.” It does the opposite: it pumps warm, moist household air straight into the coldest part of your home, where it condenses even faster.
A dehumidifier can help in a boarded, semi-enclosed loft space, but in a typical open loft it works inefficiently and rarely earns back its running cost, since the space is too draughty to hold the drier air it produces.
What’s normal in a new build, and when is it a defect?
New-build condensation is common and usually temporary. Wet plaster, screed, and structural timber can hold a substantial amount of water when a house is finished, and that moisture has to leave somehow.
NHBC guidance expects this drying-out process to balance out within roughly 18 to 24 months of completion. During that window, expect condensation to appear more readily than in an older, fully dried property, and manage it actively rather than ignoring it:
- Heat the home consistently at a moderate, steady temperature rather than switching heating on and off.
- Ventilate daily, especially after bathing or cooking, and use extractor fans correctly.
- Run any installed MVHR (mechanical ventilation with heat recovery) system as intended rather than switching it off to save on running costs.
- Use a dehumidifier in enclosed rooms if drying feels slow, particularly through the first winter.
If heavy condensation persists beyond that two-year mark, it stops being a normal drying phase and starts looking like a ventilation or build defect. That is worth raising formally with your developer or NHBC warranty provider, and it is worth reading through what proving damp is a defect in a new build actually involves before that conversation.
When should you call a specialist for a loft survey?
Some signs move past DIY territory immediately. Dripping into a bedroom ceiling, timbers that feel soft or spongy when pressed, and mould covering large sections of roof structure all warrant a professional survey rather than another weekend of self-diagnosis.
A proper survey should include:
- Moisture readings taken directly from timber and insulation, not just a visual guess
- Inspection of the roof covering from outside, checking tiles, flashings, and mortar for damage
- A full check of the ventilation path from eaves to ridge, including where insulation may be blocking airflow
- A photographic record of findings, dated and specific to your loft
A pragmatic diagnostic approach pairs an external check of tiles and flashings with an internal check of the felt and rafters, since interstitial condensation guidance from NHBC notes that intact tiling combined with dripping on cold, clear mornings points strongly to condensation rather than a leak.
Costs vary enormously depending on scope. A hatch reseal and vent clearance is a small job; installing additional roof vents or replacing felt with a breathable membrane sits at the larger end. What you should expect regardless of scale is documented findings, a clearly defined scope of remedial work, and a written guarantee before any treatment begins.
Quay Point Plastering’s survey-led approach to condensation
Every inspection starts with what is actually visible: wet felt, damp insulation, staining, mould pattern. Moisture readings back that up, and the findings get documented in writing with photographs, not verbal assumptions.
That approach has resolved recurring condensation through surprisingly modest work in many cases, clearing blocked eaves vents, resealing a leaking loft hatch, or fitting a targeted ridge vent where cross-flow simply did not exist. Larger jobs get a defined scope before any work begins, and a written guarantee follows completion. Aftercare means a client can call back if symptoms recur, not just walk away after invoicing.
— Quay
Need a proper diagnosis? Here’s how Quay Point Plastering helps
Quay Point Plastering surveys before it treats, which means you get a documented diagnosis and a defined scope of work before anyone proposes a fix, not a guess dressed up as a quote.

If your loft ticks the warning signs covered above, wet felt, damp insulation, or mould that keeps returning, a DIY vent clearance might not be enough on its own. Quay Point Plastering’s damp and timber survey covers moisture readings, ventilation path checks, and a full photographic record, giving you clear findings rather than a vague verdict of “it’s just condensation.” From there, condensation and mould treatment and any related insulation or ventilation work is scoped and quoted before a single tool comes out, with a written guarantee on the finished work. Homeowners and property managers across Dorset, Hampshire, and Wiltshire can book a survey through Quaypointplastering and get a clear, honest answer on what is actually causing the problem before agreeing to any treatment.
Sources
- Moisture in new homes: a guide for occupants — NHBC
- Condensation dripping from roof felt — Property Defect Guide
- Condensation in loft spaces: myths and realities — JBSAV / Henry Stewart Publications
- Loft condensation: actions to reduce or eliminate — GetEnergySavvy
- Roofing felt explained — Trade Store Online
FAQ
How can I stop condensation in my loft?
Clear blocked soffit and eaves vents first, then seal the loft hatch and any pipe or cable gaps that let warm air escape upward. Confirm bathroom and kitchen extractor fans vent outside rather than into the loft space itself, since misdirected ducting is a common and easily fixed cause.
Should I worry about condensation in the attic?
Occasional light condensation on a cold morning is common and not usually urgent, but persistent dripping, damp insulation, or mould spreading across rafters needs attention. Left untreated, it can lead to timber rot and reduced insulation performance, so a damp and timber survey is worth booking once symptoms recur regularly.
Is it worth putting a dehumidifier in the loft?
A dehumidifier works well in an enclosed, boarded room but is generally inefficient in a typical open, draughty loft space. Fixing ventilation and sealing air leaks addresses the actual cause, whereas a dehumidifier only manages the symptom at a running cost.
Does condensation mean my house is too cold?
Not necessarily. Loft condensation is more often a sign that warm, moist air from lower in the house is escaping upward through gaps and meeting a cold roof surface, rather than a sign of an underlying cold house. Improving airtightness at the ceiling level, alongside good ventilation, usually resolves it without needing to raise heating levels.
Is loft condensation different from a new-build home?
Yes. New-build properties commonly show condensation for the first 18 to 24 months while construction moisture in plaster, screed, and timber dries out, according to NHBC guidance. If heavy condensation continues beyond that period, it is worth investigating as a possible ventilation defect rather than assuming it will resolve on its own.