
Up to a Year to Dry: Survey Cavity Wall Damp First
Up to a Year to Dry: Survey Cavity Wall Damp First
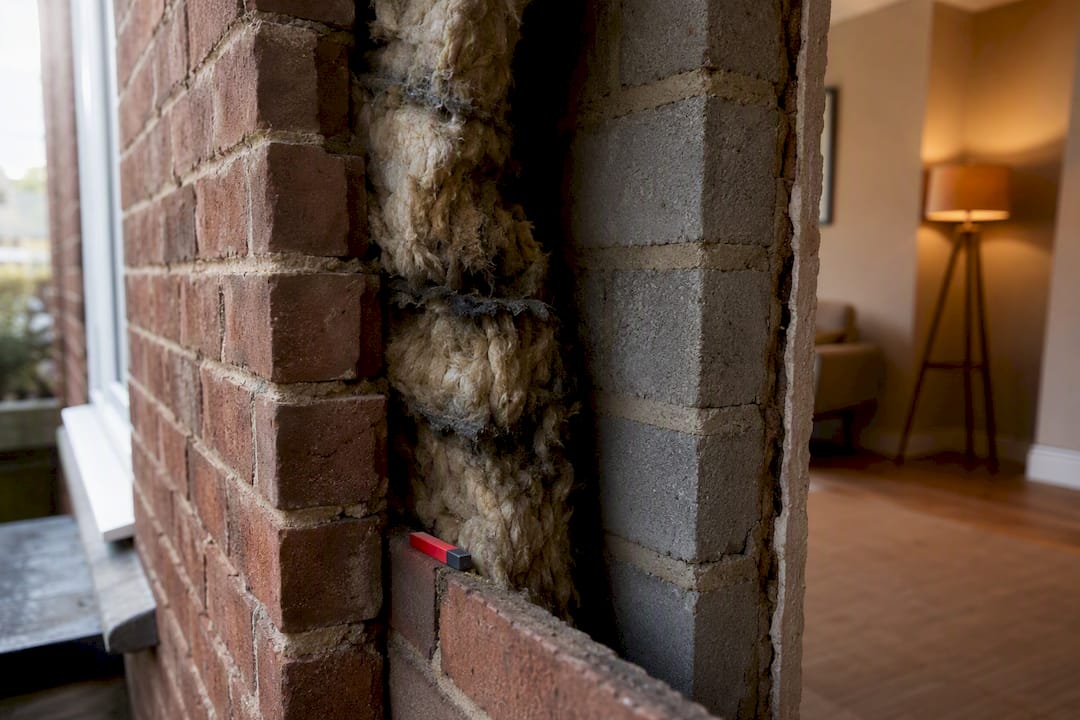
Cavity wall insulation can cause damp, but only when it is unsuitable for the property or poorly installed. It is not always the culprit behind a damp patch, so do not assume. Photograph the pattern, note whether it worsens after rain or during the heating season, check your gutters and any visible weep holes, then contact your installer or book an independent survey. Act quickly if you see mould, crumbling plaster, or damp that spreads upward after heavy rain.
TL;DR:
- Proper diagnosis requires external inspection of cavity trays, weep holes, and pointing defects before interior assessments begin.
- Moisture inside cavities often results from blocked weep holes or deteriorated cavity trays, not necessarily the insulation itself.
- Repair strategies depend on the cause; extraction of saturated insulation is necessary if insulation bridging is confirmed by borescope inspection.
- Drying can take from one month to over a year; using breathable finishes helps prevent damp resurgence after repair.
- Most damp recurrence stems from poor maintenance, such as obstructed gutters, damaged pointing, or sealed vents, not faulty insulation alone.
Table of Contents
- Why cavity wall insulation can lead to damp
- Recognising the signs of damp in cavity walls
- How professionals diagnose cavity wall moisture
- Fixing cavity wall damp: your remedial options
- Preventing damp from coming back
- When to bring in a specialist
- Why survey-first diagnosis beats guesswork
- Get a survey-led diagnosis for your damp problem
- Sources
Why cavity wall insulation can lead to damp
A cavity wall works because the gap between the outer and inner leaf breaks the path water would otherwise take to reach your living space. Fill that gap with the wrong material, or fill it badly, and you can turn the cavity into a bridge instead of a barrier. This is called moisture bridging, and it happens when insulation material touches both leaves of the wall, or when debris and mortar snots left in the cavity during construction create a solid path for water to cross.
Weep holes and cavity trays do a quiet but essential job: they let any water that does get into the cavity drain back out at the base of the wall or above openings like windows and doors. When installers fill the cavity without checking these details, or when existing weep holes get blocked by insulation fill, mortar, or vegetation, water has nowhere to go. It sits in the fill and migrates inward instead. Damaged pointing and neglected gutters make this worse by feeding more water into the wall in the first place.
Some properties were never good candidates for retrofit insulation, whatever the sales pitch promised at the time:
- Narrow cavities or rubble-filled cavities, where there is no clear air gap left to insulate safely.
- Walls in highly exposed locations, such as coastal or hilltop properties, that take driving rain directly onto the brickwork.
- Timber-framed buildings with a cavity, where filling the gap can trap moisture against structural timber.
Wall ties corrode over time, and pointing deteriorates in ways invisible from the ground. Insulation installed correctly a decade ago can behave very differently in a wall that has since developed hairline defects, which is one reason older installations sometimes cause problems years after the fact.
Recognising the signs of damp in cavity walls
The pattern of a damp patch tells you almost as much as its size. Look for these signs before you call anyone out:
- Damp patches that reappear in the same spot on an external wall, often at a consistent height or beneath a window sill.
- Mould growth concentrated in one area rather than spread across a room, particularly on external walls rather than internal partitions.
- Cold patches on the wall surface that feel damp to the touch and stay wet longer than the surrounding plaster.
- Staining, tide marks, or visible dampness that appears or worsens within a day or two of heavy rain.
Timing is your best diagnostic clue. Damp that spikes after rainfall points towards penetrating damp or insulation bridging, whereas patches that worsen when the house is occupied, with steamed-up windows and black mould around cooler surfaces, usually mean condensation rather than a wall defect. A steady, low-level dampness that never quite dries, often rising from skirting level, suggests rising damp or a plumbing leak instead.
Before booking a survey, gather dated photographs of the affected area, note the weather in the days beforehand, and check whether the pattern lines up with a downpipe, gutter joint, or render crack outside. That information saves a surveyor time and helps distinguish cavity damp from other causes at the first visit.
How professionals diagnose cavity wall moisture
A competent survey does not start with a moisture meter pressed against the nearest wall. It starts outside. A surveyor will check the condition of cavity trays, look for blocked or missing weep holes, inspect the damp proof course, and assess pointing and guttering for defects that could be feeding water into the structure. Only once the external fabric has been checked does attention move inside, matching the pattern of internal damp to what has been found outside.
Where the cause is not obvious from a visual inspection, three tools do most of the diagnostic work:
- Thermal imaging highlights temperature differences across a wall surface, which often reveal wet insulation fill or cold bridging before any staining appears.
- Borescope inspection allows a surveyor to look directly inside the cavity through a small drilled hole, confirming whether fill is present, saturated, or has slumped away from the top of the wall.
- Calibrated moisture readings taken at intervals over time show whether a wall is drying, static, or getting wetter, rather than relying on a single snapshot reading.
A proper report should identify the likely moisture path, not just the symptom, and set out a defined scope of remedial work, an estimated drying timeline, and any follow-up checks needed once repairs are complete. The Property Care Association’s code of practice on damp control specifically requires surveyors to record whether retrofit insulation is present and to check damp proof courses and cavity trays as standard, precisely because insulation can conceal defects that would otherwise be visible.
If insulation was installed under a guarantee scheme, contact the installer or the Cavity Insulation Guarantee Agency before commissioning separate remedial work, since a valid CIGA guarantee may cover extraction and repair at no cost to you.
Pro Tip: Ask any surveyor whether their report will name a specific moisture path, not just “damp present.” A report that cannot say where the water is coming from cannot tell you what to fix.
Fixing cavity wall damp: your remedial options
Not every case of cavity wall damp needs the same treatment, and getting the sequence wrong wastes money. The Property Care Association’s guidance sets out a clear order: diagnose the moisture path, isolate and repair the external defects causing it, allow the wall to dry, then reinstate finishes. Skipping straight to redecoration before the cause is fixed just buys you a repeat problem in a year or two.
When insulation itself is the problem, confirmed by borescope inspection showing saturated or degraded fill, extraction is usually the only lasting fix. This involves drilling access points and vacuuming the material out of the cavity, then inspecting and repairing cavity trays and pointing before deciding whether to refill with a different material or leave the cavity empty. Where the fill itself is sound but weep holes are blocked or gutters are failing, targeted repairs, clearing weep holes, fixing gutters, repointing damaged mortar joints, can resolve the problem without touching the insulation itself.
For properties where the cavity was never a good candidate for fill, three routes are worth weighing up:
- Leave the cavity empty and accept the loss of thermal performance rather than risk recurring damp.
- Refill with a breathable mineral wool product where the cavity width and exposure genuinely allow it.
- Consider external wall insulation instead, which avoids the cavity altogether but changes the building’s appearance and typically costs more.
Removal costs vary considerably depending on wall area and access, and the Energy Saving Trust notes that qualified extraction and reinstatement should always be carried out by a specialist rather than attempted piecemeal. More telling is what happens after removal: research referenced by Axiom Eco Homes suggests a majority of reported retrofit insulation failures involve moisture-related issues, which underlines why a pre-installation survey matters as much as the repair itself.
Drying is the part homeowners underestimate most. Depending on wall thickness and the permeability of existing renders or paint, drying and redecoration can take anywhere from one month to a year or more. Repainting with an impermeable, plastic-based paint before the wall has genuinely dried traps residual moisture behind the new coating, which is one of the most common causes of damp returning within months of a repair. Vapour-permeable finishes and correctly specified replastering allow the wall to keep breathing while it finishes drying out.
Preventing damp from coming back
Most recurrence comes down to neglected maintenance rather than a failed repair. A short seasonal routine catches problems while they are still cheap to fix:
- Clear gutters and downpipes at least twice a year, more often near overhanging trees.
- Check pointing for cracks or erosion, particularly on exposed elevations facing prevailing wind and rain.
- Keep weep holes visible and unobstructed, and check they have not been rendered or painted over.
- Keep ground levels, paving, and flower beds below the level of the damp proof course.
Ventilation matters as much as waterproofing. A steady background level of heating through colder months, combined with proper extraction in kitchens and bathrooms, keeps internal humidity down and reduces the load on the wall structure. If you insulate a wall, check that trickle vents and airbricks have not been accidentally sealed in the process, since blocking ventilation while adding insulation is a common way to swap one damp problem for another.
Before any retrofit insulation work, insist on a survey that checks cavity width, wall exposure, and the condition of existing cavity trays and the damp proof course. Timber-framed properties and anything with a genuinely narrow or debris-filled cavity should not be insulated internally without specialist advice first.
Pro Tip: Take a photo of your weep holes now, while the wall is dry. Compare it after the next heavy storm. If water is pooling or staining directly below them, they are already doing less than they should.
When to bring in a specialist
Some situations call for a professional survey rather than another round of DIY monitoring. Book one if you see:
- Active mould growth that returns within weeks of cleaning it off.
- Plaster that is bubbling, blowing, or falling away from the wall.
- Damp patches that reappear after every heavy rainfall despite gutter checks.
- Multiple affected rooms, or a tenant reporting the same issue repeatedly.
The right appointment depends on what you are seeing. A general damp and timber survey suits an unclear pattern, while a targeted penetrating damp investigation fits damp that clearly tracks with rainfall. Ask any contractor what diagnostic methods they use, whether you get a written report with a defined scope of work, what guarantee backs the remedial work, and how long drying and redecoration will realistically take.
Keep dated photographs, installer paperwork, and any guarantee certificates, whether CIGA-backed or from an independent insurance-backed scheme, in one file. That evidence is what turns a dispute into a straightforward claim.
Why survey-first diagnosis beats guesswork
Most damp repairs fail for one reason: someone treated the symptom instead of tracing the moisture path. A documented survey beats an assumption every time when diagnosing damp, mould, and timber problems.
Mapping the visible symptom back to its actual cause, blocked weep hole, failed cavity tray, saturated fill, is what separates a lasting repair from a cosmetic patch that fails again next winter. That is why every job starts with inspection, not treatment.
Homeowners can receive a documented findings report, a clearly defined scope of remedial work, estimated costs, and a written guarantee on workmanship with specialist damp services. There is no treatment until the diagnosis is settled and agreed.
— Quay
Get a survey-led diagnosis for your damp problem
Specialist damp services offer an alternative to guesswork repair quotes for cavity wall damp: a documented survey and a defined scope of work before any treatment starts, not a price for treatment that has not been diagnosed.

That matters because, as covered above, the wrong fix (refilling a cavity that should stay empty, repainting a wall that has not finished drying) can make cavity wall damp worse rather than better. A damp and timber survey identifies the actual moisture path using moisture readings and borescope inspection where needed, so the remedial work addresses the cause rather than the stain on your plaster. If your damp appears specifically after rainfall, the dedicated diagnosis for damp after rain covers exactly that pattern. Every job comes with a written scope of work and a workmanship guarantee, so you know what has been fixed and what to expect afterwards. Book a survey and get a documented answer instead of another guess.