
Wet skirting boards: how to diagnose and fix them
Wet skirting boards: how to diagnose and fix them
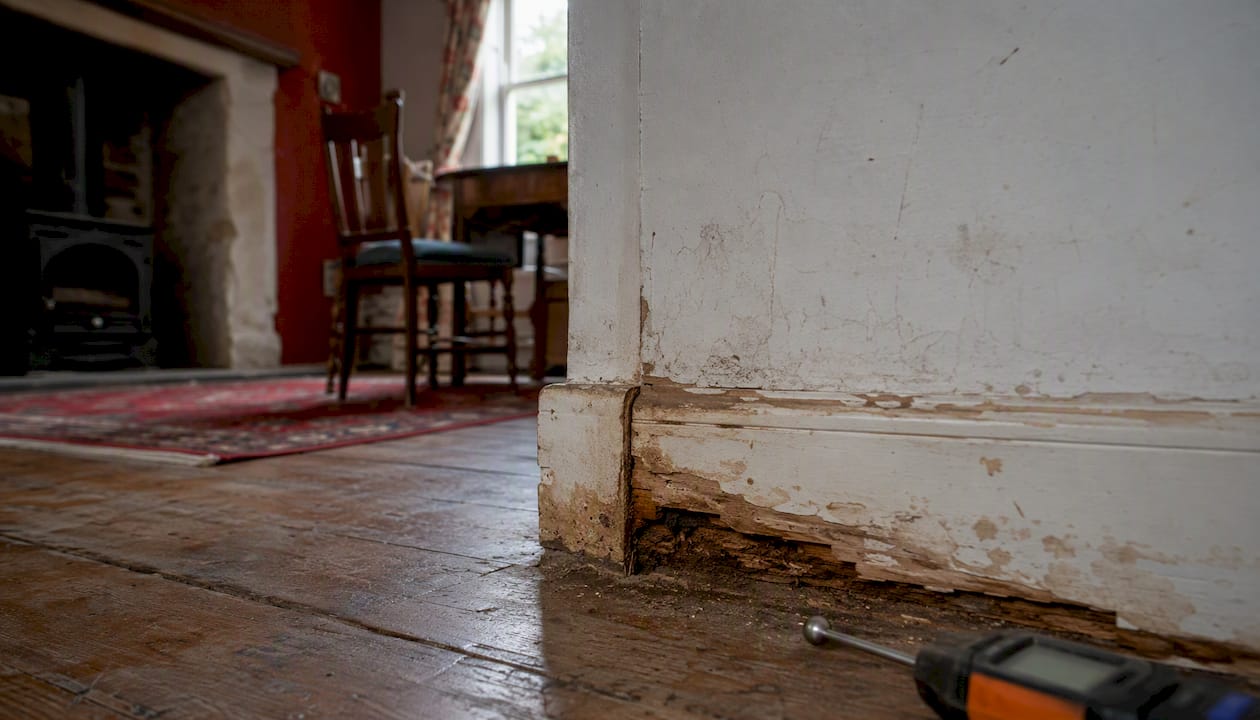
If your skirting boards are wet, the first priority is to stop the water source and check the timber for rot before doing anything else. Wet skirting boards are a symptom, not the problem itself, and treating the surface without addressing the cause will mean the issue returns.
Immediate next steps:
- Isolate the source. Turn off any nearby plumbing if you suspect a leak. If the wetting appeared after heavy rain, check gutters and external ground levels.
- Photograph everything now. Take close-up photos of the affected skirting, the wall above it, and the floor junction. These images matter for a surveyor, your insurer, and for tracking whether the damp spreads.
- Press-test the timber. Press your thumb firmly against the skirting. Soft, spongy, or crumbling timber indicates rot and needs professional assessment. Firm timber that is simply discoloured or paint-blistered is a less urgent situation.
Call an emergency tradesperson immediately if you can see active water flowing, if the floor feels structurally soft, or if there is any risk of electrical fittings being exposed to water. For everything else, continue with the diagnostic steps below.
Safety note: Do not sand, drill, or disturb skirting boards that show signs of fungal growth until the rot type has been identified. Dry rot spores can spread during disturbance. Wear an FFP2 or FFP3 mask and nitrile gloves when handling mouldy timber, and isolate nearby electrical sockets before working in wet areas.
Pro Tip: Take a short video as well as photos. A video captures the extent of the affected area and any visible water movement in a way that static images cannot, and it is far more useful when describing the problem to a surveyor.
Key takeaways
Stopping the moisture source before treating or replacing skirting boards is the single most important step: every other action depends on it.
| Point | Details |
|---|---|
| Stop the source first | No treatment or replacement will last if the moisture source is still active. |
| Photograph and measure | Record moisture readings and photos before and after any work to support surveys, guarantees, and insurance claims. |
| Know your rot type | Wet rot stops when moisture is removed; dry rot can spread beyond damp timber and requires specialist treatment immediately. |
| MDF vs real timber | MDF skirting typically needs replacement after water exposure; pre-treated softwood can often be dried, treated, and reinstated. |
| Quaypointplastering | Provides survey-led damp and timber investigations with written reports, moisture readings, and guaranteed remedial work across Dorset, Hampshire, and Wiltshire. |
Table of Contents
- How can you tell if skirting boards are damp or rotting?
- What causes wet skirting boards in UK homes?
- Wet rot versus dry rot: what does each mean for your skirting boards?
- Step-by-step treatment plan for damp skirting boards
- When should you book a professional damp and timber survey?
- How to stop skirting boards getting wet again
- What do damp skirting board repairs typically cost in the UK?
- DIY fixes versus specialist work: a practical decision guide
- Why Quaypointplastering prioritises a survey-first approach
- Quaypointplastering: survey-led damp and timber diagnosis in Dorset, Hampshire, and Wiltshire
- Sources
How can you tell if skirting boards are damp or rotting?
The fastest diagnostic combines three things: a visual check, a tactile press test, and a moisture reading at the wall-to-floor junction. Together, these tell you whether you are dealing with surface marking, active damp, or timber decay.
Visual signs to look for:
- Discolouration or tide marks on the skirting or the wall directly above it
- White powdery deposits (efflorescence or salt crystallisation) on plaster near the skirting
- Blistering, peeling, or bubbling paint on the skirting face
- Dark staining or visible mould growth, particularly at the back edge or base of the board
- Soft, darkened, or shrunken timber at the ends or lower edge of the board
Tactile checks add what the eye misses. Press firmly along the full length of the skirting, paying particular attention to corners and the ends where boards meet. Firm resistance is a good sign. Any give, sponginess, or crumbling under light pressure points to wet rot or advanced decay. A musty, earthy smell at skirting level, even without visible mould, is worth noting.
A moisture meter used at the wall-to-floor junction gives you a reading to record and share with a surveyor. Pin-type meters are widely available and straightforward to use: press the pins into the timber or plaster and note the reading. Elevated readings in the plaster above the skirting, combined with signs of rising damp such as tide marks and salt deposits, suggest a structural moisture source rather than a surface problem. A hygrometer placed in the room for 24 hours will tell you whether ambient humidity is high enough to cause condensation at cold surfaces near the floor.
Statistic callout: Decayed and rotting skirting boards are commonly a sign of rising damp, with tide marks and crumbling plaster typically appearing above the skirting.
Photograph every reading and every visible sign before touching anything. A surveyor working from your photos can often narrow the likely cause before they arrive on site, which saves time and helps you get a more accurate written scope of works.
What causes wet skirting boards in UK homes?
Several distinct moisture sources can produce wet or damp skirting boards, and they look different from each other if you know what to check. Misidentifying the cause is the most common reason remedial work fails.
The four most common causes in UK properties:
- Rising damp. Groundwater moves upward through masonry where the damp-proof course (DPC) is absent, failed, or bridged. The distinguishing clues are a horizontal tide mark at a consistent height (typically up to 1 metre above floor level), white salt deposits on plaster, and skirting boards that are consistently damp regardless of weather or season. Rising damp diagnosis and treatment requires a professional survey to confirm, as other causes can mimic the appearance.
- Penetrating damp. Water enters through an external defect: cracked render, failed pointing, a leaking window seal, or a blocked gutter. The key distinguishing feature is that the damp patch is localised and typically worsens after rain. Damp appearing after rain is a strong indicator of an external defect rather than a structural moisture issue.
- Plumbing leaks. A slow leak from a pipe, radiator, or appliance can saturate the floor and skirting boards quickly. Onset is usually fast, the wetting is localised to one area, and nearby floorboards may also feel damp or soft. Check under kitchen and bathroom units, behind washing machines, and at radiator valves.
- Condensation. Warm, humid air meets a cold surface near the floor and deposits moisture. Mould on skirting boards is often caused by condensation and poor ventilation rather than rising damp. The clue is patchy, surface mould that appears seasonally (typically autumn and winter), improves when ventilation increases, and is often worse behind furniture placed close to external walls.
Statistic callout: In many UK homes, floor-level mould is more often linked to condensation or inadequate ventilation than to true rising damp, based on contextual diagnosis. Diagnosing by context, including seasonality, window condensation, and furniture placement, avoids unnecessary invasive work.
Peripheral causes worth checking:
- Blocked or overflowing gutters directing water down the external wall
- External ground levels that have been raised above the DPC, bridging it and allowing moisture to bypass the barrier
- Leaking appliances (dishwashers, washing machines, underfloor heating pipes)
- Neighbouring property issues such as a shared wall with a damp cellar or a poorly maintained party wall
Note the timing of when the damp appears. Damp that worsens after rain points to penetrating damp or a bridged DPC. Damp that is consistent year-round and accompanied by salt deposits is more likely rising damp. Damp that appeared suddenly and is confined to one room is more likely a plumbing leak. Recording this timing in writing, alongside your photographs, gives a surveyor the context to reach a faster and more accurate diagnosis.
Wet rot versus dry rot: what does each mean for your skirting boards?
Identifying the rot type matters because it determines the urgency, the scope of remedial work, and whether the skirting can be treated in place or must be removed entirely.
Wet rot is confined to timber that remains persistently damp. Once you remove the moisture source and dry the timber, wet rot stops progressing. It is the more common of the two in skirting boards and is usually manageable with targeted treatment and, in some cases, partial replacement.
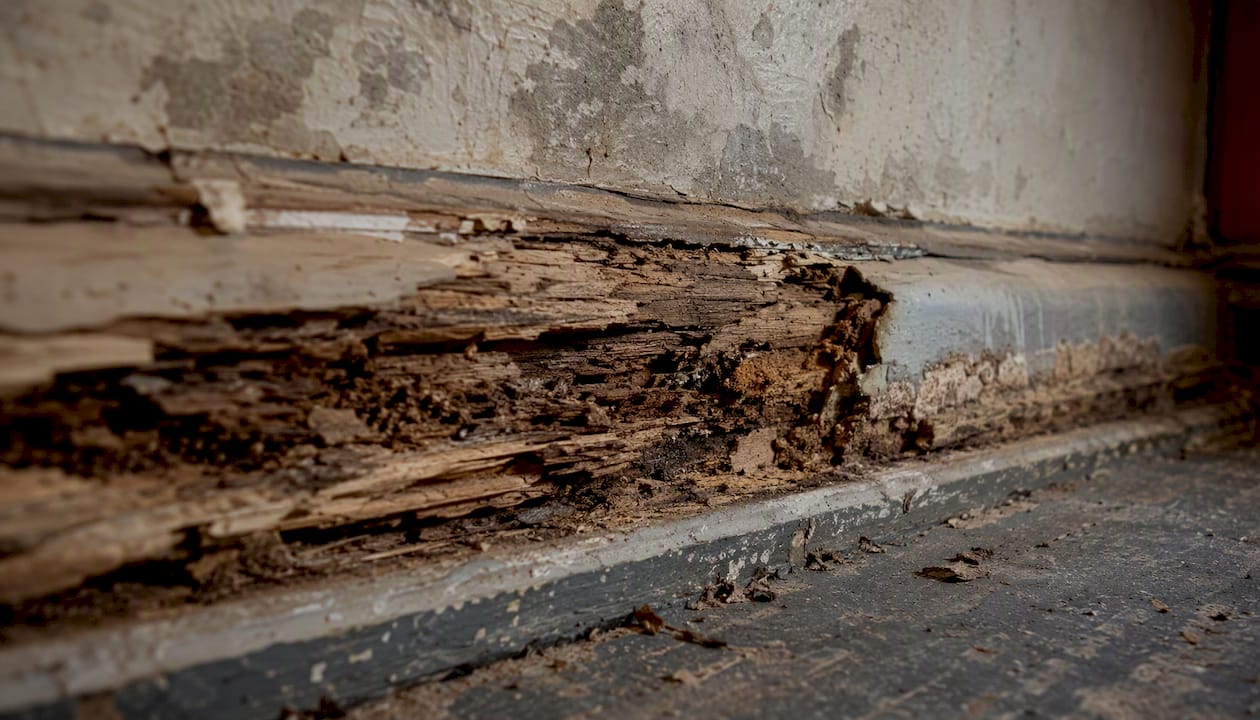
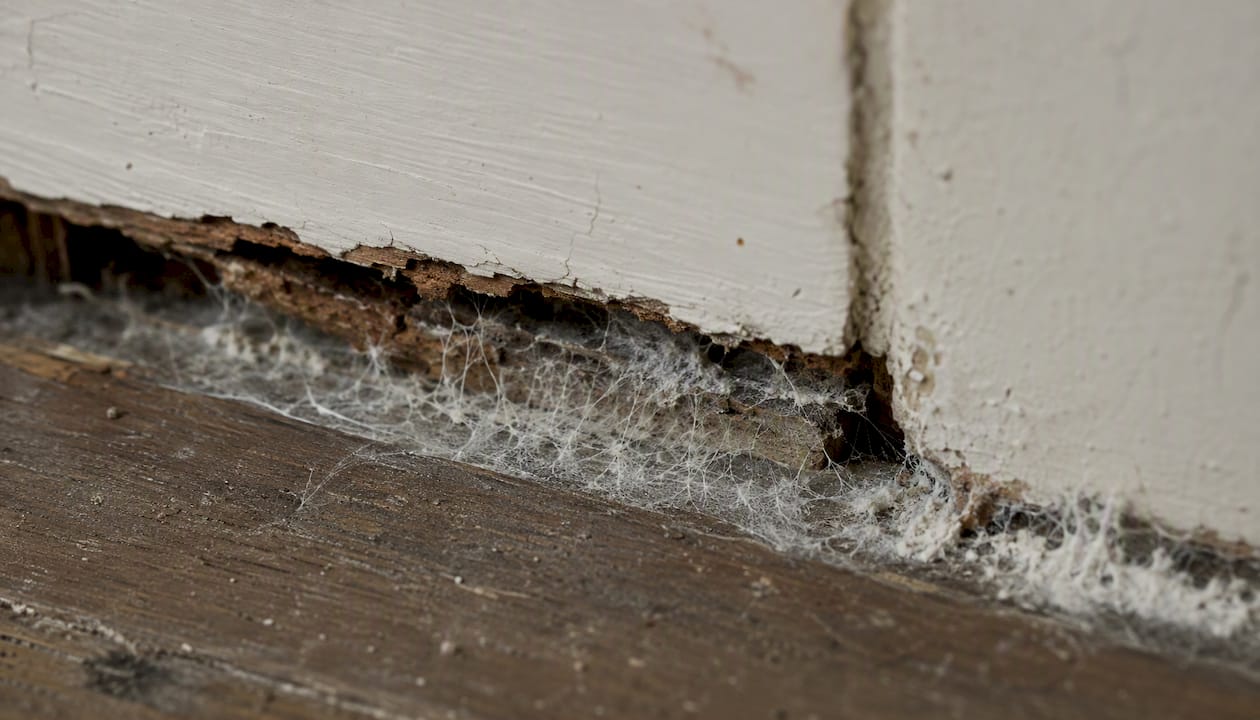
Dry rot (Serpula lacrymans) is a different matter. It can spread beyond the damp timber into adjacent dry materials, travelling through plaster, mortar, and even brickwork. It requires specialist treatment and, in most cases, removal of affected timber well beyond the visible boundary of the growth.
| Feature | Wet rot | Dry rot |
|---|---|---|
| Appearance | Dark brown or black, cracked along the grain, soft and spongy | Orange-brown, cuboid cracking, powdery when dry |
| Smell | Musty, damp earth | Sweet, mushroom-like |
| Spread | Confined to damp timber | Can spread into dry materials |
| Fungal growth | Dark strands, no fruiting body visible at skirting level | White/grey mycelium sheets, orange/yellow fruiting bodies |
| Urgency | Moderate: treat once moisture is resolved | High: requires immediate specialist survey |
| Skirting outcome | Often treatable in place if caught early | Removal and specialist treatment required |
Red flags that mean you should book a specialist survey immediately:
- Orange or yellow fruiting bodies (bracket-shaped or pancake-shaped growths) on or near the skirting
- White or grey cotton-wool-like mycelium spreading across the wall surface
- Timber that crumbles into cube-shaped fragments when pressed
- Decay spreading beyond the area of visible damp
If you see any of these signs, do not disturb the area. A timber survey will confirm the rot type, map the extent of spread, and produce a documented scope of works before any treatment begins.
Step-by-step treatment plan for damp skirting boards
The action sequence is: stop the moisture source, dry the area thoroughly, inspect and test the timber, then treat or replace before reinstating and monitoring. Skipping the first two steps and going straight to replacement is the most common reason the problem returns.
Effective treatment starts with identifying and stopping the moisture source before removing or replacing skirting. Here is the full sequence:
-
Isolate the moisture source. Fix the plumbing leak, repair the external defect, clear the blocked gutter, or arrange a survey to confirm rising damp before touching the skirting. If you cannot identify the source, do not proceed to step 2 until you have professional guidance.
-
Ventilate and dry the area. Open windows, run a dehumidifier, and if possible remove furniture from the affected wall. Allow the area to dry naturally before assessing the timber. Forced drying with a heat gun can cause surface checking in timber without drying the core, so use ambient ventilation where possible. A dehumidifier running continuously in a closed room is more effective than intermittent window opening.
-
Remove the skirting carefully. Use a bolster chisel and a flat pry bar to detach the skirting without damaging the plaster behind it. Label each board so you can reinstate in the correct position if it is salvageable. Photograph the wall and floor behind the skirting before doing anything else.
-
Assess the timber. Press-test the exposed back face and ends. Check the floor joist ends if the floor is suspended timber. If the timber is firm and the moisture reading has dropped to an acceptable level after drying, treatment in place may be viable. MDF skirting commonly swells and requires replacement after water exposure, while real timber can often be treated and reinstated if drying and preservation are correctly applied.
-
Apply a registered timber preservative. Use a product registered for the purpose (look for HSE-approved wood preservatives). Apply according to the manufacturer’s instructions, paying particular attention to end grain, which absorbs moisture fastest. This step is not optional for any timber that has shown signs of fungal activity.
-
Replace or reinstate the skirting. Where timber is beyond treatment, replace with pre-treated softwood rather than MDF, particularly in bathrooms, kitchens, or any room with a history of moisture. Fix with appropriate adhesive and fixings, leaving a small gap at the base for airflow.
-
Monitor and document. Take moisture readings at the same points weekly for four to six weeks after reinstatement. Record the readings with dates and photographs. This documentation supports any guarantee claim and provides evidence for your insurer if needed.
Pro Tip: Before reinstating skirting, apply a bead of low-modulus silicone at the floor junction rather than a rigid filler. It accommodates seasonal movement and prevents the gap that allows moisture to track behind the board.
When should you book a professional damp and timber survey?
Book a professional survey when damp is recurring, when it covers a large area, when plaster is crumbling, or when you suspect dry rot. A survey is also the right call when you have fixed an obvious cause and the damp has not resolved within a few weeks.
Persistent or returning mould and damp at skirting level that does not respond to ventilation or cleaning is a clear sign that a deeper issue needs professional investigation.
What a professional damp and timber survey includes:
A damp and timber survey typically covers visual inspection of internal and external surfaces, moisture meter readings at multiple points across the affected area, timber probe tests to assess decay depth, a ladder or roof check where external defects are suspected, and photographic evidence compiled into a written report. The report should state the likely cause, the recommended scope of works, moisture targets for redecoration, and the guarantee terms that apply to the remedial work.
Questions to ask before commissioning a survey:
- What qualifications and experience does the surveyor hold in damp and timber diagnosis?
- Will you receive a written report with moisture readings and photographs?
- Does the scope of works include a moisture target before redecoration is permitted?
- What guarantee is provided on the remedial work, and what does it cover?
- Can you see a sample scope of works from a comparable previous job?
The trust signals that distinguish a thorough survey from a superficial visit are straightforward: before-and-after photographs, documented moisture readings at named locations, a written scope tied to those readings, and a guarantee with defined terms. A contractor who cannot provide these in writing is not offering a survey-led service. Damp problems explained covers what a properly documented approach looks like in practice.
How to stop skirting boards getting wet again
Preventing recurrence is almost always cheaper than repair. Most cases of skirting board damp can be traced to one or two maintenance failures that are straightforward to address once the source is known.
Room-by-room prevention measures:
- Bathrooms and shower rooms. Run the extractor fan during and for at least 20 minutes after bathing. If there is no extractor, fit one: a through-wall unit or a ducted ceiling fan both work. Trickle vents in window frames help maintain background ventilation. Seal bath and shower trays with a mould-resistant silicone annually.
- Kitchens. Use the extractor hood when cooking and keep it clean so it draws effectively. Check under the sink and behind appliances for slow leaks at least twice a year.
- Living rooms and bedrooms. Move furniture at least 50mm away from external walls to allow air to circulate. This is particularly relevant in older properties where external walls are cold and condensation forms readily at floor level.
- External maintenance. Clear gutters and downpipes at least once a year, ideally in late autumn after leaf fall. Check that external ground levels have not been raised above the DPC line: the DPC should sit at least 150mm above finished ground level. Repair cracked render and failed pointing promptly.
Maintenance checklist (recommended annually):
- Inspect and clear all gutters and downpipes
- Check external ground levels against the DPC
- Inspect plumbing connections under sinks and behind appliances
- Check window and door seals for deterioration
- Inspect skirting boards in bathrooms, kitchens, and ground-floor rooms for early signs of discolouration or paint blistering
Pro Tip: When replacing skirting after a damp event, choose pre-treated softwood rather than MDF. MDF has no resistance to moisture and will swell and delaminate if the damp recurs. Pre-treated softwood, properly primed on all faces including the back and ends before fixing, gives you a board that can survive minor moisture exposure without immediate failure.
Landlords have a specific responsibility under the Homes (Fitness for Human Habitation) Act 2018 to maintain adequate ventilation. If you manage a tenanted property and a tenant has reported skirting board damp or mould, a landlord damp and mould inspection provides the documented evidence you need to demonstrate a proper response.
What do damp skirting board repairs typically cost in the UK?
Costs vary considerably depending on the cause, the extent of decay, and whether access work such as plaster removal is required. A small, isolated area of surface damp with no timber decay is a very different job from a ground-floor room with rising damp, failed plaster, and rotted skirting throughout.
Key cost drivers:
- The underlying cause (condensation is usually the least expensive to address; rising damp and dry rot are typically the most involved)
- How much timber has decayed and whether floor joists are affected
- Whether plaster needs to be hacked off and reinstated
- Access requirements (moving kitchen units, lifting floor coverings)
- Contractor day rates, which vary across Dorset, Hampshire, and Wiltshire
- Whether a written guarantee is included in the price
Indicative timescales:
- Drying after a plumbing leak (small area): 3–7 days with a dehumidifier running continuously
- Drying after penetrating damp (once source is fixed): 2–6 weeks depending on wall thickness and season
- Minor skirting replacement (one room, no plaster work): typically 1–2 days
- Full survey-to-completion for rising damp with plaster reinstatement: 2–6 weeks from survey to sign-off, depending on drying targets
Obtain at least one written estimate that specifies the scope of works, the moisture targets that must be reached before redecoration, and the guarantee terms. A written scope protects you if the work needs to be revisited and gives you a basis for comparing quotes. When considering wider joinery replacement decisions alongside skirting, guidance on replacing interior joinery can help you weigh up the cost and value of a full reinstatement versus targeted repair.
DIY fixes versus specialist work: a practical decision guide
A simple rule of thumb: surface mould that clears with ventilation and cleaning, or an isolated damp patch that dries completely once a minor leak is fixed, is within the scope of a competent DIYer. Anything involving structural decay, spreading fungal growth, or damp that returns despite your efforts requires a specialist.
DIY-appropriate tasks:
- Cleaning surface mould with a diluted fungicidal wash (wear an FFP2 mask and gloves)
- Improving room ventilation by fitting or upgrading extractor fans and trickle vents
- Sealing minor leaks at bath trims, sink surrounds, and pipe penetrations
- Temporary drying with a dehumidifier while the source is investigated
- Replacing a single length of skirting that has surface discolouration but is structurally firm
Tasks that require a specialist:
- Rising damp treatment (chemical DPC injection or membrane installation)
- Dry rot eradication (requires removal of affected timber to defined margins, specialist biocide treatment, and often structural input)
- Major penetrating damp where the external defect is not obvious or accessible
- Structural timber replacement where floor joists or wall plates are affected
- Any situation where the cause is unconfirmed after basic checks
Safety warnings:
- Do not disturb suspected dry rot without specialist guidance. Disturbing fruiting bodies can spread spores.
- Wear an FFP2 or FFP3 mask and nitrile gloves when handling any mouldy material.
- Isolate electrical sockets and fittings in the affected area before working. Do not assume a socket is safe because it appears dry on the outside.
- If you are unsure whether a floor is structurally sound, do not walk on it until it has been assessed.
Keep a written log of every DIY action you take: what you did, when, and what moisture readings you recorded before and after. This record supports any future survey, insurance claim, or guarantee application. Why black mould keeps returning explains why surface-only treatment without addressing the source is rarely a permanent fix.
Why Quaypointplastering prioritises a survey-first approach
The most common mistake we see is treatment without diagnosis. A homeowner paints over mould, replaces a length of skirting, and calls it done, only to find the same problem back within a season. The reason is almost always the same: the moisture source was never properly identified, so nothing that was done addressed the actual cause.
On-site moisture readings matter because they give you a number, not a guess. When we record moisture levels at specific points across a wall, note the readings in a written report, and photograph the condition before and after treatment, both the homeowner and the contractor have a clear record of what was found, what was done, and what the target condition is before redecoration. That documentation is what makes a guarantee meaningful. Without it, a guarantee is just a verbal assurance.
Quaypointplastering covers Dorset, Hampshire, and Wiltshire, and the survey-led approach applies to every job regardless of size. Written guarantees and documented aftercare are standard, not optional extras.
Quaypointplastering: survey-led damp and timber diagnosis in Dorset, Hampshire, and Wiltshire
Persistent skirting board damp that has not responded to DIY measures, or any situation where you suspect rising damp, penetrating damp, or timber decay, calls for a documented on-site assessment rather than further guesswork.

Quaypointplastering provides survey-led damp and timber investigations across Dorset, Hampshire, and Wiltshire. Every survey produces moisture meter readings at documented locations, photographic evidence, a written report, and a defined scope of works with moisture targets for redecoration. Written guarantees cover all remedial work. Whether the issue is rising damp, penetrating damp, condensation, or timber decay, the starting point is always a proper diagnosis, not a treatment sold before the cause is confirmed. To book an inspection or discuss what you are seeing, contact Quaypointplastering directly via Quaypointplastering.
Sources
The following sources provide additional technical detail and official guidance on damp, timber care, and property maintenance in the UK.
- What rising damp looks like | Signs to watch for | Homeowners
- Mould on skirting boards in the UK: Rising Damp or Just Condensation?
- How to treat damp skirting boards? – Damp Surveyors Ltd