
Survey First: 3 Floor Joist Rot Repair Methods for Homeowners
Survey First: 3 Floor Joist Rot Repair Methods for Homeowners
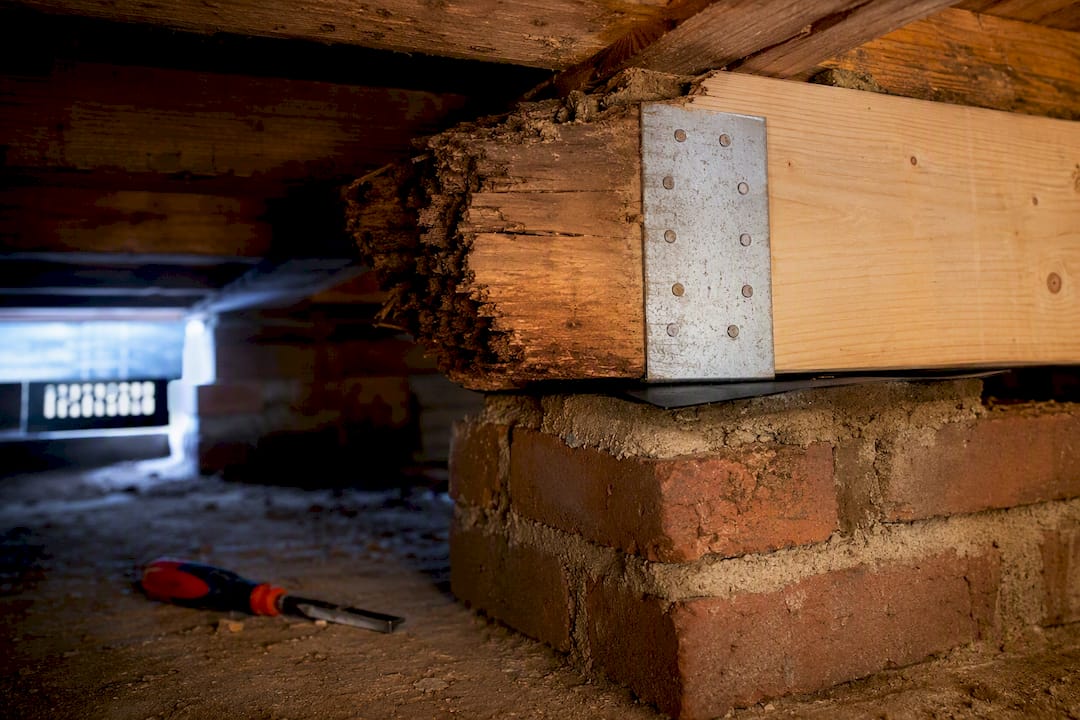
Most rotted floor joists can be repaired rather than replaced wholesale, using sistering, end repair plates, or partial replacement depending on how far the decay has spread. The first priority is always to stop the moisture source and, if the floor feels unsafe to stand on, shore it with props before you do anything else. Everything after that depends on how deep the damage runs, which the next section shows you how to test properly.
TL;DR:
- Repair is feasible for most rotted floor joists if moisture sources are stopped, with partial or full replacement based on the damage extent.
- Early signs like soft spots, a musty smell, and cracking timber should prompt moisture testing and physical probing to assess structural integrity.
- For limited, shallow rot, DIY repairs such as sistering or end plates are suitable, but extensive damage requires professional assessment and potentially structural engineering.
- Preventative measures, including fixing external leaks and improving ventilation, are crucial to stop rot recurrence and extend repair longevity.
- A detailed, documented survey is essential before repair, providing a record that supports guarantees, clearer scope of work, and effective long-term maintenance.
Table of Contents
- What are the signs of floor joist rot, and how do you diagnose it?
- Should you DIY the repair or call in a professional?
- Sistering, end repair, and replacement: which method fits which damage?
- How to actually carry out the repair: step by step
- How do you stop the rot coming back?
- What does joist repair cost, and how long does it take?
- Why a documented survey changes the outcome
- What other conditions make joist rot worse besides damp?
- What ongoing maintenance actually prevents joist rot?
- Which materials hold up best in joist repairs?
- Sensible DIY versus knowing when to stop
- How Quay Point Plastering approaches joist and timber repairs
- Sources
- FAQ
What are the signs of floor joist rot, and how do you diagnose it?
Rot rarely announces itself with a bang. It shows up as a soft spot near a skirting board, a slight bounce underfoot that wasn’t there last year, or a musty smell drifting up through the boards. Catching these early signs of joist rot before they become structural problems is the difference between a weekend repair and a full replacement job.
Look and feel for:
- Sagging or springy floors, especially near external walls, bathrooms, or kitchens where moisture collects.
- Soft, spongy timber that gives under thumb pressure without a tool.
- A musty, earthy smell, often the first sign of wet rot or dry rot before any visible damage appears.
- Fine white or grey fungal strands (mycelium) or a mushroom-like fruiting body, both signs of dry rot rather than simple wet rot.
- Cracked or “cuboidal” cracking timber that crumbles into small brick-shaped chunks when pressed. That pattern is a classic dry rot signature.
- Discoloured or darkened wood around joist ends where they meet masonry, usually where damp has been sitting longest.
Once you’ve spotted a likely area, two simple tests tell you far more than a visual check alone.
The screwdriver test. Push a flat-blade screwdriver into the suspect timber at a slight angle. Sound timber resists with real effort. If the blade sinks in under moderate hand pressure with little resistance, that’s a strong indicator the joist has lost meaningful structural strength, not just surface colour. Test several points along the joist, particularly the last 300mm at each bearing end, because that’s where rot most often starts.
The moisture meter reading. A pin-type moisture meter gives you a number, not a guess.
Statistic Callout: Timber becomes vulnerable to active fungal decay once its moisture content sits above roughly 19%, according to NHBC standards on timber preservation. Below that figure, most fungal activity stalls; above it, decay can continue spreading even after you’ve patched the visible damage.
That threshold matters because it tells you whether you’re dealing with a drying-out problem or an active, ongoing one.
If the joists sit over a crawl space or suspended floor void, accessing them safely matters as much as the diagnosis itself. Wear a decent respirator mask before disturbing old insulation or fibreglass, which can hold decades of dust, and take a torch with a strong beam rather than relying on a phone light. Confined, low-headroom spaces are also where dry rot spreads fastest and least visibly, so a full sweep with a moisture meter across several joists, not just the one that’s sagging, is worth the extra hour.
Should you DIY the repair or call in a professional?
Some joist rot is well within reach of a competent DIYer with the right tools and patience. Other cases need a structural engineer or specialist contractor before anyone touches a saw, and getting that call wrong is where things go expensive.
Book a professional survey or structural assessment if you see any of the following:
- More than one joist affected. Rot rarely stays confined to a single timber once moisture has been present for years, and assessing several members changes the load calculation entirely.
- Visible sagging in the floor above. A dip you can see with the naked eye, rather than feel underfoot, usually means the joist has already lost significant section.
- Dry rot rather than wet rot. Because dry rot can spread via mycelium through masonry and adjoining timber, containment often needs a larger removal zone than the visibly affected area suggests.
- A failed screwdriver test across multiple points. Widespread softening, rather than one localised patch, points to a structural rather than cosmetic problem.
- Joists near a load-bearing wall, staircase opening, or beam bearing. Any repair here interacts with the building’s structure, not just the floor finish, and mistakes are far harder to spot until something moves.
If the floor genuinely feels unsafe (visible deflection, cracking sounds, or a joist you can push by hand) stop walking on it and shore it temporarily. Adjustable steel props under a spreader board, positioned under solid ground below, can take the load safely for days or weeks while you arrange an inspection. Never rely on stacked bricks or offcuts as a permanent fix; they shift.
Pro Tip: Photograph every suspect area before you shore or disturb anything, including a tape measure or coin in frame for scale. If you do end up booking a damp and timber survey, those photos speed up the diagnosis and give the surveyor a timeline of how the damage has changed.
A proper damp and timber survey should give you more than a verbal opinion. Expect documented findings: moisture readings taken at multiple points, photographs of each affected joist, a mapped extent of the damage, and a written scope of works setting out exactly what needs doing and why. That documentation matters later too, whether you’re negotiating with a buyer, a mortgage lender, or simply want a record of what was fixed and when.
Sistering, end repair, and replacement: which method fits which damage?
Repairing rotted joists isn’t a single technique. The right method depends entirely on where the rot sits on the joist and how much of the timber’s original cross-section survives.
Sistering: for partial or mid-span damage
Sistering is the standard fix when a joist has lost strength along part of its length but the timber itself hasn’t crumbled away completely. The method involves fixing a new length of matching timber alongside the damaged joist so the two work together as one stronger member.
Sistering is the standard structural repair for partially compromised joists: install a full or long-length matching member alongside the damaged joist, fasten with a staggered pattern of screws or bolts, and add construction adhesive between the two timbers to create a composite beam rather than two separate boards moving independently.
That adhesive step is easy to skip and easy to regret skipping. A gap between old and new timber, even a small one, tends to produce squeaking floors months later as the boards flex against each other under load.
Sistering works best when:
- The rot is confined to one section of the joist’s length, not the full span.
- At least 50% of the original timber’s sound cross-section remains.
- The joist ends themselves (where they meet the wall) are still sound.
It’s a poor fit for end rot, because the sister board still relies on the same weakened bearing point unless you extend it past the damaged section and onto solid masonry.
Joist end repair with plates: for rot at the bearing
End rot, where the joist meets an external wall or sleeper wall, is one of the most common patterns because that’s where damp masonry, poor ventilation, and condensation concentrate. Here, the fix isn’t sistering along the length; it’s cutting back the decayed section entirely and rebuilding the bearing.
Professionals cut away the decayed section, treat the exposed timber with preservative, place a damp-proof course strip, then use a galvanised joist repair plate so the new timber bears on the masonry directly rather than relying on what’s left of the old, weakened end. That detail, getting the new timber to bear on brick or block rather than on a patched-up stub of old joist, is what separates a durable repair from one that fails again in five years.
The DPC strip sits between the new timber and the masonry to stop damp wicking straight back up into fresh wood. Skip it and you’ve simply restarted the same decay cycle with better-looking timber.
Partial or full replacement: for compromised cross-sections
When rot has eaten through most of a joist’s depth, or when several joists in the same bay have failed, patching stops making sense. Replacement means removing the failed timber entirely and installing a new joist, either resting on existing bearings or hung from joist hangers where the wall construction allows it.
Full replacement is the right call when:
- The joist has lost more than half its structural depth to decay.
- Multiple adjacent joists are affected, changing the load-sharing assumptions for the whole bay.
- The timber shows dry rot cuboidal cracking through most of its length rather than at one end.
Where chemical treatment fits, and where it doesn’t
Borate-based preservatives have a real role, but it’s a preventative one, not a repair. Borate treatments help protect surrounding, still-sound timber from future fungal attack but do nothing to restore structural capacity already lost to decay.
Use borate treatment on the sound timber adjacent to a repair, as part of a wider remediation package that includes structural work and moisture control, never as a standalone fix for timber that’s already failed the screwdriver test.
How to actually carry out the repair: step by step
Before any cutting starts, get the groundwork right. Rushing this stage is where most DIY joist repairs go wrong.
Preparation:
- Isolate any nearby electrical cables or pipework running through or near the joist bay, and turn off relevant services if work will disturb them.
- Set up temporary support: adjustable props under a timber spreader board, positioned on solid ground, taking the load either side of the repair zone.
- Record the current floor level with a spirit level or laser line before you start, so you can check it’s been restored afterwards.
- Put on a respirator mask, gloves, and eye protection, particularly if old insulation or fibreglass needs moving first.
Sistering a partially rotted joist:
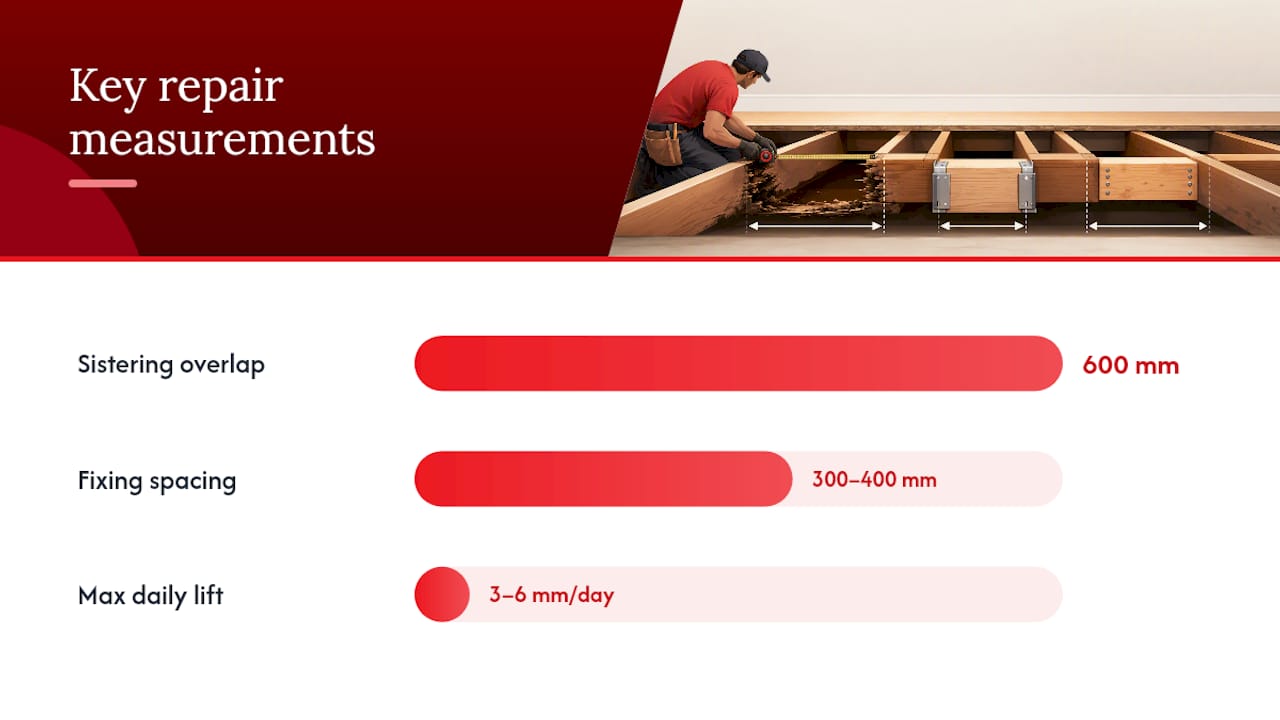
- Measure and cut a new joist of matching depth, ideally running the full span or at least 600mm past each end of the damaged section.
- Apply construction adhesive along the contact face of the new timber before positioning it tight against the old joist.
- Fix with coach screws or bolts in a staggered pattern along the length, typically every 300 to 400mm, alternating top and bottom.
- Check level across the repair with a spirit level, and pack any small gaps at the bearing with treated timber shims, never softwood offcuts that can compress.
- Refit noggins or blocking between joists if they were removed for access.
End repair with plates:
- Mark and cut back the decayed timber to sound wood, checking with the screwdriver test as you go until you hit solid material.
- Treat the freshly cut end and surrounding timber with a preservative suited to the timber species.
- Lay a DPC strip on the masonry bearing before the timber goes back in, so no fresh timber sits directly on damp brick.
- Fit a galvanised joist repair plate spanning from the sound section of the original joist onto the masonry bearing, ensuring the new load path runs through solid material, not the old weak end.
- Fix the plate with the fixings specified by the manufacturer, typically screws or bolts sized to the plate’s load rating.
Full replacement:
- Prop and jack the floor gradually either side of the failed joist, never in one aggressive lift.
- Remove the failed timber once the load has transferred safely to the props.
- Cut and fit the new joist to length, using joist hangers where the wall construction requires them rather than notching into brickwork.
- Seat the new joist on its bearings, checking level against your earlier reference line.
- Remove props gradually once the new timber is fully fixed and load-bearing.
Pro Tip: If you’re jacking a sagging floor back level, go slowly. Lifting more than roughly 3 to 6mm per day risks cracking plaster and ceiling finishes on the floor above. A floor that’s sagged for years won’t (and shouldn’t) come back level in an afternoon.
Tools and materials checklist:
- Adjustable steel props and spreader boards
- Spirit level and laser line
- Moisture meter
- Flat-blade screwdriver for probing
- Reciprocating saw or handsaw for cutting back decayed timber
- Galvanised joist repair plates and joist hangers sized to load
- DPC strip material
- Timber preservative and construction adhesive
- Coach screws, bolts, or structural fasteners rated for the load
- Matching structural timber for sistering or replacement
How do you stop the rot coming back?
Repairing the timber without fixing what caused the rot is the single most common reason joist repairs fail again within a few years. The wood didn’t rot because it was unlucky; it rotted because something kept it wet.
Start outside the building, not underneath it. Blocked or overflowing gutters, cracked downpipes, and ground levels that slope towards the wall rather than away from it are the most common external culprits, and they’re usually cheaper to fix than the joist repair itself. Inside, check for leaking pipework, a failed washing machine connection, or a shower tray that’s been letting water track under the floor for months without anyone noticing.
Once the source is dealt with, focus on the void itself:
- Improve cross-ventilation. Blocked or too few air bricks starve a suspended floor void of airflow, letting humidity build even after you’ve fixed the leak.
- Install or upgrade a vapour barrier across the ground within the void, particularly over bare earth, to cut moisture rising from the soil.
- Use treated timber and DPC strips at every point where new or existing timber contacts masonry, not just at the repair itself.
- Consider active dehumidification in persistently damp voids where passive ventilation alone isn’t managing to keep levels down.
Statistic Callout: Encapsulation and a quality vapour barrier are widely recommended alongside a target of keeping crawl space relative humidity below a threshold recommended to prevent timber moisture reaching levels that support fungal growth. Maintaining this humidity helps protect the timber even in a void that looks dry.
Getting the ventilation strategy right at this stage is what actually determines whether your repair lasts ten years or two.
What does joist repair cost, and how long does it take?
Cost varies enormously depending on scope, and that’s before you factor in moisture remediation. A single sintered joist with good access, done as a straightforward DIY job, involves little more than the cost of matching timber, fasteners, and adhesive. Professional jobs cost considerably more once labour, access, and disposal of decayed timber are factored in, and multiple-joist replacement paired with encapsulation work increases the bill substantially compared with a single localised repair.
The main cost drivers are:
- Access. Lifting floorboards in a finished room costs more than working in an open crawl space or unfinished cellar.
- Number of joists affected. Repairing one joist versus five changes both material and labour costs, and sometimes triggers the need for a structural engineer’s input.
- Moisture remediation scope. Adding a vapour barrier, ventilation upgrades, or dehumidification pushes the total well beyond the timber repair alone.
- Structural sign-off. Any repair affecting a load-bearing wall or major span may need an engineer’s calculations, adding professional fees.
Why a documented survey changes the outcome
A survey that only tells you “there’s some rot under the floor” isn’t much use six months later when you’re wondering whether it’s coming back. What matters is a record: moisture readings at specific points, dated photographs, and a mapped extent of the damage rather than a verbal impression.
A well-documented damp and timber survey gives you moisture readings, photographic evidence, a mapped extent of the affected area, and a clear scope of works, outputs that reduce the risk of repeat failures because everyone involved is working from the same evidence rather than guesswork.
That documentation matters for three reasons:
- It gives you a written scope of works, so you know exactly what’s being fixed and why before any work starts.
- It supports a written guarantee, because the surveyor has a clear before-and-after record to stand behind.
- It gives you a baseline for aftercare, so any future check can compare against real numbers rather than memory.
Quay Point Plastering has worked on damp and timber problems across Dorset, Hampshire, and Wiltshire for over 35 years, and every job starts with that same survey-led diagnosis before any treatment is recommended.
What other conditions make joist rot worse besides damp?
Moisture is the trigger for fungal decay, but it’s rarely acting alone. Poor airflow around a void, even a relatively dry one, lets humidity linger long enough for spores to establish, which is why two houses with similar damp levels can have very different rot outcomes depending on how well the void breathes.
Timber species and treatment history matter too. Untreated softwood joists installed before preservative treatment became standard practice are considerably more vulnerable than modern treated timber exposed to the same moisture levels.
Insect activity compounds the problem rather than causing it independently. Woodworm and, in some regions, termite activity exploit timber that’s already softened by fungal decay, since damp, decaying wood is easier for larvae to tunnel through than sound timber. Where you see both frass (fine wood dust) and softened, discoloured timber together, you’re likely looking at insect and fungal damage working in combination, not one or the other. Checking whether old woodworm holes are still active is worth doing alongside the rot assessment, since treating one problem while ignoring the other rarely solves anything permanently.
Temperature plays a smaller but real role. Warmer, poorly ventilated voids accelerate fungal growth rates compared with cold, well-aired ones at the same moisture content, which is part of why summer humidity spikes sometimes trigger visible rot that a damp winter alone hadn’t produced.
What ongoing maintenance actually prevents joist rot?
Prevention is cheaper than repair by a wide margin, and most of it comes down to a handful of checks done consistently rather than any single big intervention.
Clear gutters and check downpipes at least twice a year, particularly after autumn leaf fall, since blocked guttering is one of the most common causes of water tracking down external walls and into joist ends. Keep air bricks and sub-floor vents free of soil, plant growth, or debris; it’s astonishing how often a flower bed built up against a wall ends up burying the ventilation a suspended floor relies on.
Check plumbing connections under kitchens and bathrooms annually, since a slow leak under a sink or bath can run for years before staining becomes visible on a ceiling below. If you’ve had any previous damp or timber work done, a follow-up moisture reading a year later confirms the repair has held rather than assuming it has.
Finally, don’t let a small musty smell go uninvestigated. It’s usually the earliest, cheapest-to-fix sign that something’s holding moisture, well before any visible sagging or staining appears.
Which materials hold up best in joist repairs?
Choice of timber and hardware matters as much as the repair method itself. Using untreated softwood in a repair that sits anywhere near a masonry bearing is asking for a repeat problem within a decade.
For structural timber, use pre-treated (tanalised) softwood rated for the relevant use class, matching or exceeding the depth and grade of the original joist. Galvanised or stainless steel fixings, coach screws, bolts, and joist repair plates resist corrosion far better than plain steel, particularly in voids where humidity fluctuates. A DPC strip at every masonry contact point is non-negotiable, cheap, and easy to skip if you’re rushing.
For moisture control, a heavy-duty polythene vapour barrier across the void floor and preservative treatment on any timber within reach of splashback or condensation both extend the life of a repair considerably beyond the cost of the materials themselves.
Sensible DIY versus knowing when to stop
Localised, shallow rot in a joist you can dry out and verify with a moisture meter is genuinely reasonable DIY territory. Widespread damage, dry rot, or anything near a load-bearing wall is not; that’s structural engineering, not carpentry. When in doubt, get one documented survey before you start cutting. Moisture control almost always costs less than redoing the same repair twice.
— Quay
How Quay Point Plastering approaches joist and timber repairs
Quay Point Plastering starts every timber job with a survey, not a quote. That means documented moisture readings, photographs, and a written scope of works before any treatment gets recommended, so you know exactly what’s wrong and why before you agree to anything.

If you’ve spotted soft flooring, a musty smell, or a failed screwdriver test somewhere in your home, a damp and timber survey gives you the same documented findings a professional would use to plan the repair, backed by a written guarantee once work is agreed. Quay Point Plastering has covered Dorset, Hampshire, and Wiltshire for over 35 years, and the process stays the same whether the problem is a single sistered joist or a full dry rot containment job: inspect first, document clearly, then agree a defined scope before any timber gets touched.
Have your access points, any photos you’ve already taken, and a description of the symptoms ready, and get in touch to book a timber and damp survey with the team.
Sources
For readers who want to check the technical detail behind this guide, NHBC’s chapter on timber preservation sets out the moisture thresholds referenced throughout. DIYdoctor’s guide to repairing structural joists and This Old House’s joist repair walkthrough both cover practical diagnosis and repair steps in more depth. For a cautionary look at where cosmetic fixes like epoxy repair fall short on genuinely structural damage, see this Australian case study on epoxy wood repair costs.
- DIYdoctor — repairing structural joists
- Rapidrepair
- This Old House — how to repair a cracked floor joist
FAQ
Can you stop wood rot once it starts?
Yes, once the timber’s moisture content drops below roughly 19%, active fungal decay stalls, but any timber that has already lost significant structural strength still needs physical repair, not just drying out.
How much does it cost to fix a rotted floor joist?
Cost depends heavily on scope: a single sistered joist with good access and DIY labour costs relatively little in materials, while multiple-joist replacement combined with moisture remediation runs considerably higher once professional labour, access work, and encapsulation are included.
Are rotten floor joists covered by insurance?
Most standard home insurance policies exclude gradual deterioration like timber decay, treating it as a maintenance issue rather than a sudden, insurable event, though sudden escape of water from a specific incident (a burst pipe, for example) may be covered separately.
How do I know if I need a professional rather than DIY?
Book a survey if more than one joist is affected, you see visible sagging, the timber shows dry rot’s characteristic cuboidal cracking, or the screwdriver test fails at multiple points along the joist.
What does a damp and timber survey actually check?
A proper survey records moisture meter readings at multiple points, photographs the affected areas, maps the extent of the damage, and produces a written scope of works, the same documentation Quay Point Plastering provides before recommending any timber treatment.